How to Not Get Lost on the Trail

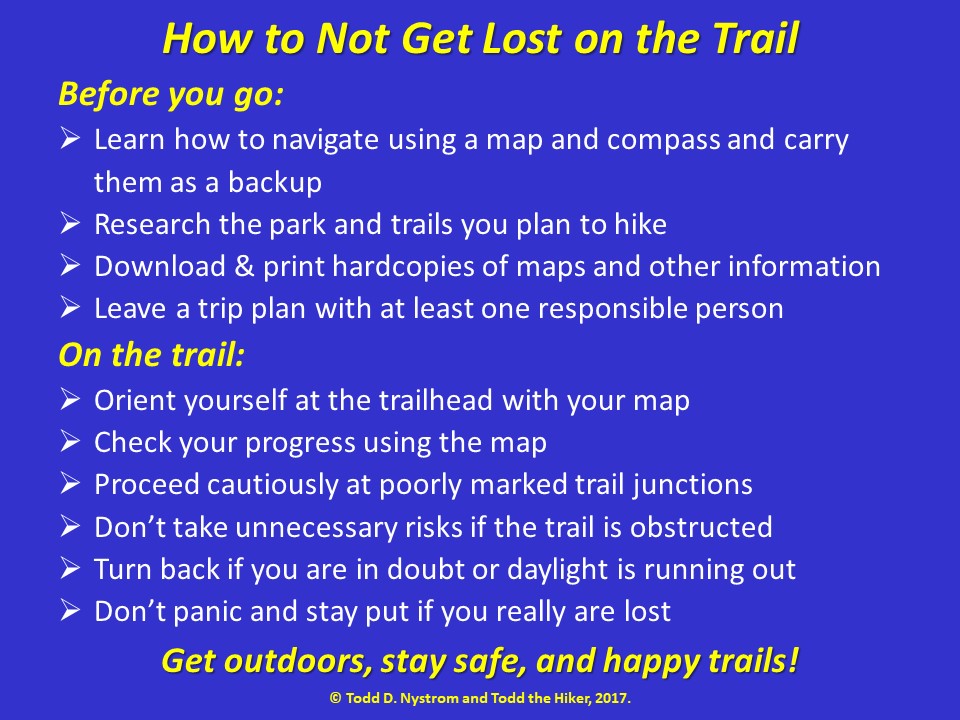
Make me to know your ways, O Lord; teach me your paths.  ~Psalm 25:4 (ESV)

On one of our many day hiking trips to the Red River Gorge Geological Area in Daniel Boone National Forest, we encountered a couple at the trailhead who were on a multi-day backpacking trip.  As we were loading gear into the car after our hike, a man approached us seemingly to ask for directions.  After a brief discussion it turned out he and his wife were hoping to get a ride because they had taken a wrong turn on the trail and were now three miles off their intended route, and around eight miles from their vehicle.  We happily gave them a ride, and our conversation on the drive inspired me to post a few thoughts on how to not get lost on the trail.

Before You Go:

Learn how to navigate using a map and compass and carry them as a backup:  With today’s amazing GPS technology and the availability of some excellent smart phone apps, many people rely exclusively on these devices.  As much as I am a fan of digital technology, there are limitations:  batteries run out, devices break, software fails, and GPS signals can be obscured by weather, rough terrain, and heavy foliage.  For these reasons I strongly recommend learning how to read a topographic map and navigate using a magnetic compass and carrying both as a backup especially when exploring more rugged and remote areas.  There are plenty of good books to get you started, but hands-on experience is important if you ever have to count on these skills.  Check with a local park, outfitter, or hiking club to see if they know of classes available in your area, or if you live near an REI store they typically offer a Map & Compass Navigation Basics course several times a year.

Research the trails and parks you plan to hike:  Research is amazingly easy with many helpful park websites, well written blogs, online guides, and even a number of free online sources for USGS topographic maps.  One of the most important things to understand before loading up your gear and heading to a new destination is the difficulty of the trails and terrain you will face so you show up prepared with appropriate maps and trail guides.  In parks with good signage and well-blazed, easy-to-follow trails, a simple overview map showing roads, trails, facilities, and a few geographic features may be sufficient.  But, in rugged terrain with twisting, turning, or poorly marked trails, a detailed topographic map and possibly a descriptive trail guide may be necessary.

Although visitor centers and park offices are usually a great source for maps and information, do your homework rather than just showing up.  Hours of operation can be unpredictable and many isolated or smaller parks close facilities in the off season, while some have no facilities at all.  Also, some parks require reservations or advance purchase of permits, especially for overnight stays, and may require you to check-in when you arrive.  Knowing and preparing for these things ahead of time will avoid disappointment later.

Map Detail Comparison

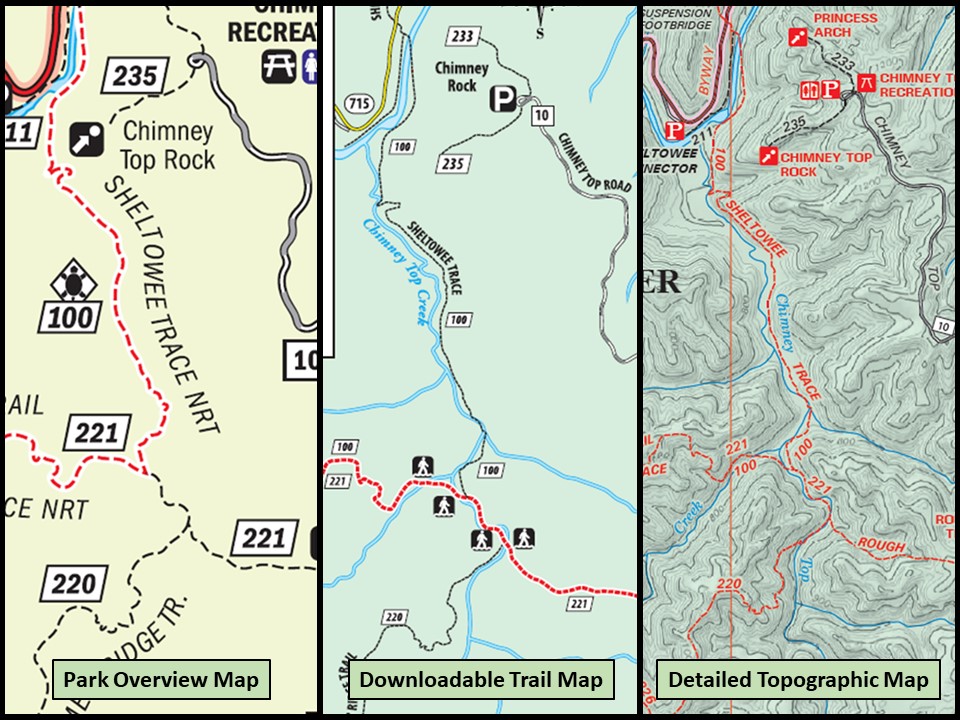
Three maps of the same area in Red River Gorge showing different levels of detail.

Download and print hardcopies of maps and other information:  You can likely find everything you need online, but make sure you download it to your devices before you go as cell service may be limited or non-existent on the trail.  Even if you are using your electronic devices as your primary navigation tool, print and carry hardcopies as a backup.  I am a big fan of physical maps and guide books; but, rather than bringing the whole map or a toting a heavy book in my pack, I make copies of the sections and pages needed, seal them in a zip-top bag to keep them dry, and carry them in a pocket so they are easily accessible on the trail. Personally I prefer using a paper topo map as my primary navigation tool as it gives a broader perspective than the confines of a phone or GPS screen.

Map sections and guide book pages ready for the trail.

Leave a trip plan with at least one responsible person:  Not every hike requires extensive planning, but the further you venture away from civilization and the longer you plan to be out, the more intentional you need to be.  Even on short day hiking trips with minimal preparations, it is good to let at least one responsible person know where you are going, who you are with, the trail(s) you intend to hike, and when you expect to be home.  On longer trips let two or three people know, and include more details, like vehicle information, local agencies to contact, and a daily itinerary with trailheads, routes, and specific campsites if possible.  An easy way to send all this info is by marking up a map with these details and attaching it to an email.  Taking the time to prepare a thorough trip plan helps familiarize you with a new area, which is helpful in keeping you from getting lost, but more importantly, by sharing it with someone else, it will help rescuers find you if something does go wrong.  Just make sure you contact everyone after you return home or if you decide to extend your trip so they don’t get concerned and start alerting the authorities.

Trip Plan Example

Example trip plan with detailed maps.

On the Trail:

Orient yourself at the trailhead with your map:  Once you arrive at the trailhead, take a few minutes to look at the map and orient yourself as things tend to look different in person than they do on a screen or in a book.  Start by finding the trailhead on your map.  As ridiculously simple as this sounds, I have actually run into quite a few people on the trail who asked for directions and were not sure where they started their hike, not a good position to be in if you find yourself lost or in need of help.  After you know your starting point, study the trails you will be hiking, as well as nearby trails, especially those intersecting your route.

Next, identify major, extended geographic features in the area such as roads, rivers, and ridgelines.  When paralleling your route, these features are called “handrails,” and when perpendicular to your route they are called “backstops.”  These features are helpful to keep you oriented along the way, but also provide easy-to-find destinations to navigate toward if you get turned around.

IMG_0243

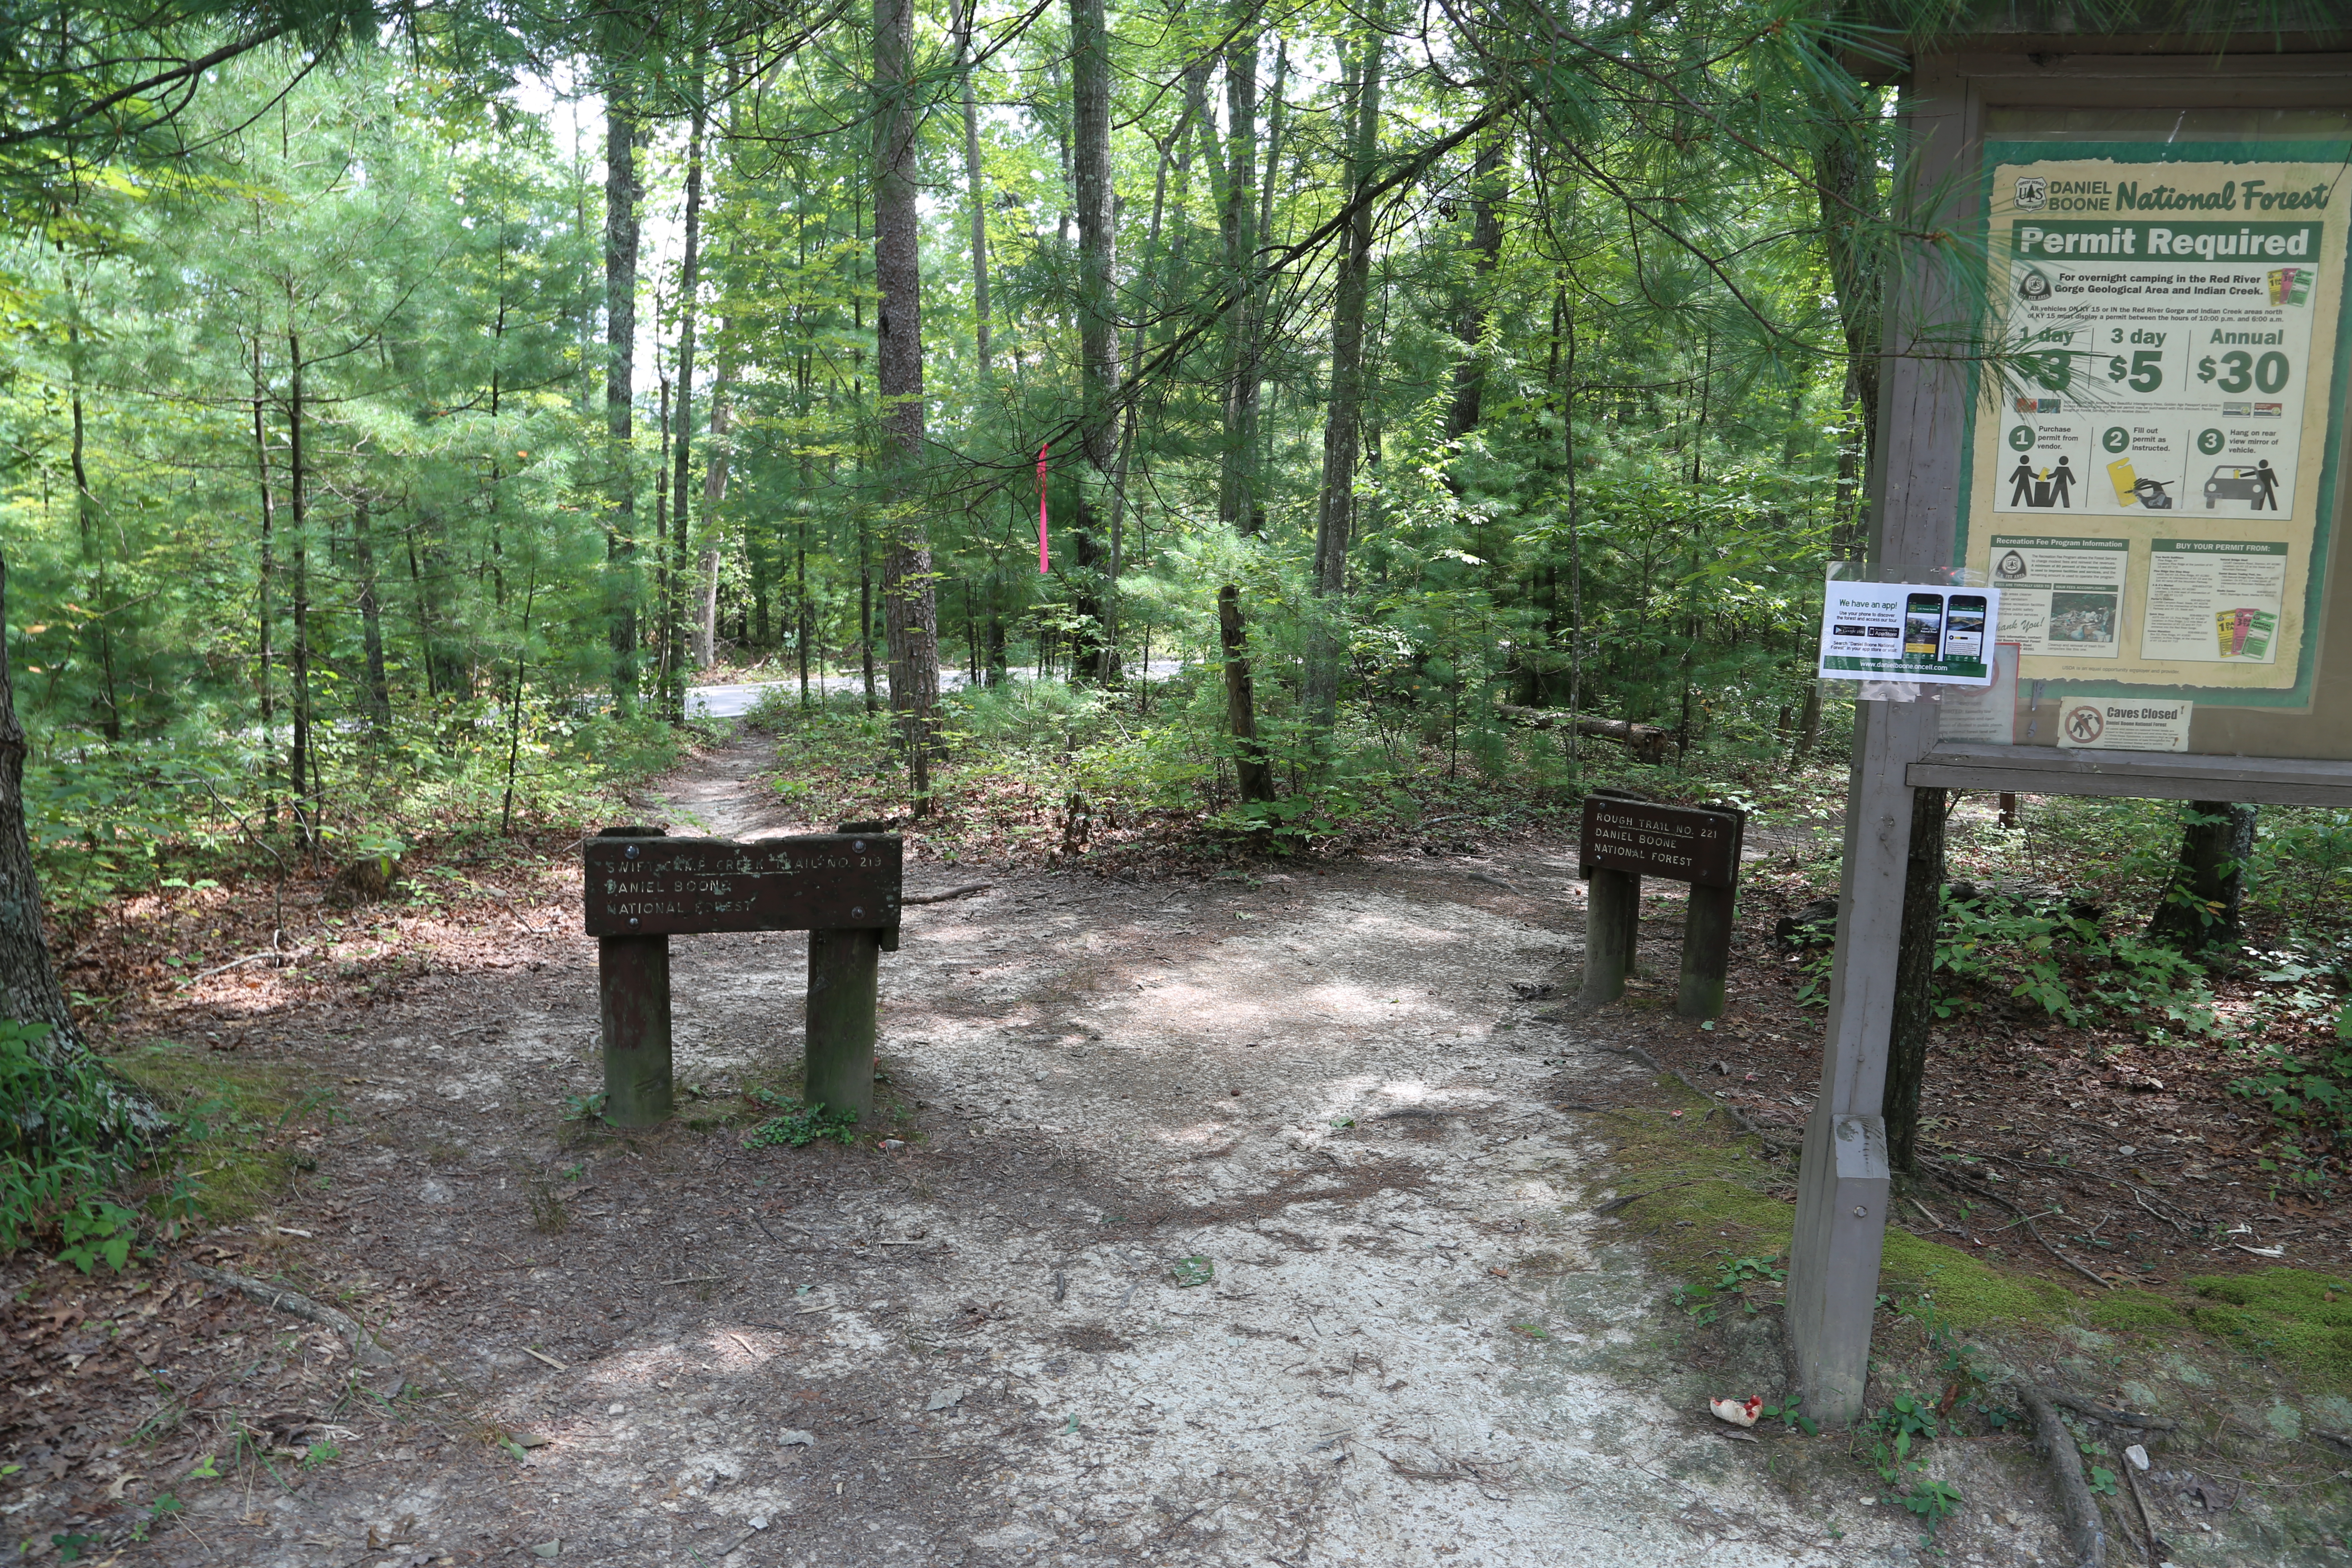
Rough Trail (#221) trailhead in Red River Gorge.

Check your progress using the map:  As you hike periodically check your progress against the map.  Pay close attention at trail junctions and always be on the lookout for distinctive landmarks such as prominent bends in the trail, high points like peaks, ridges, and cliffs, and low points like ravines, creeks, and lakes.  It is also good to look behind you on occasion as another means to stay oriented.  Even on a loop trail this could prove useful if you ever need to backtrack.  Paying attention as you go and noting each point on the map ensures you will never be too far off your desired path at any given moment.

Proceed cautiously at poorly marked trail junctions:  There are situations where extra precaution is warranted.  Areas with poorly marked or numerous unofficial trails can be particularly difficult.  Also, be aware that signs and markers are sometimes damaged by weather or vandals.  If you end up at a questionable trail junction, proceed with caution and use your map and compass to determine which path coincides with the direction you are traveling.  After choosing a route, proceed a short distance and look for trail blazes (or cairns in some environments), signs, or recognizable terrain features.  If you find a clear indictor that you are on the right path press on, but if nothing appears or the trail starts to fade, return to the trail junction and try a different direction.  If you find yourself at a particularly confusing trail junction be sure to mark the direction you came from in a non-destructive fashion to help you backtrack if you do not find a clear way forward.

IMG_7016

Weathered trail marker on Buck Trail (#226) in Red River Gorge.

Don’t take unnecessary risks if the trail is obstructed:  Another situation demanding extra precaution is when you encounter obstructions on the trail such as creek crossings, blown down trees, slides, or wash outs that require you to detour around.  If an obvious path is not evident take your time looking for a safe and clear way through, but don’t venture too far and risk losing the trail completely.

IMG_7357

One of many creek crossings you’ll find in Red River Gorge this one on Chimney Top Creek on the Sheltowee Trace National Recreation Trail.

Turn back if you are in doubt or daylight is running out:  If you are in doubt or travel becomes too difficult or hazardous, it is always better to turn back and try another day.  Also, pay attention to the time as well as the distance you have traveled and the distance you still need to hike to reach your destination.  If it looks like you will lose daylight take the fastest and easiest route back to the trailhead.  Carrying a headlamp or flashlight is an essential precaution, but even with a light source night navigation is difficult in good conditions, and can be downright dangerous in many circumstances.

IMG_2678

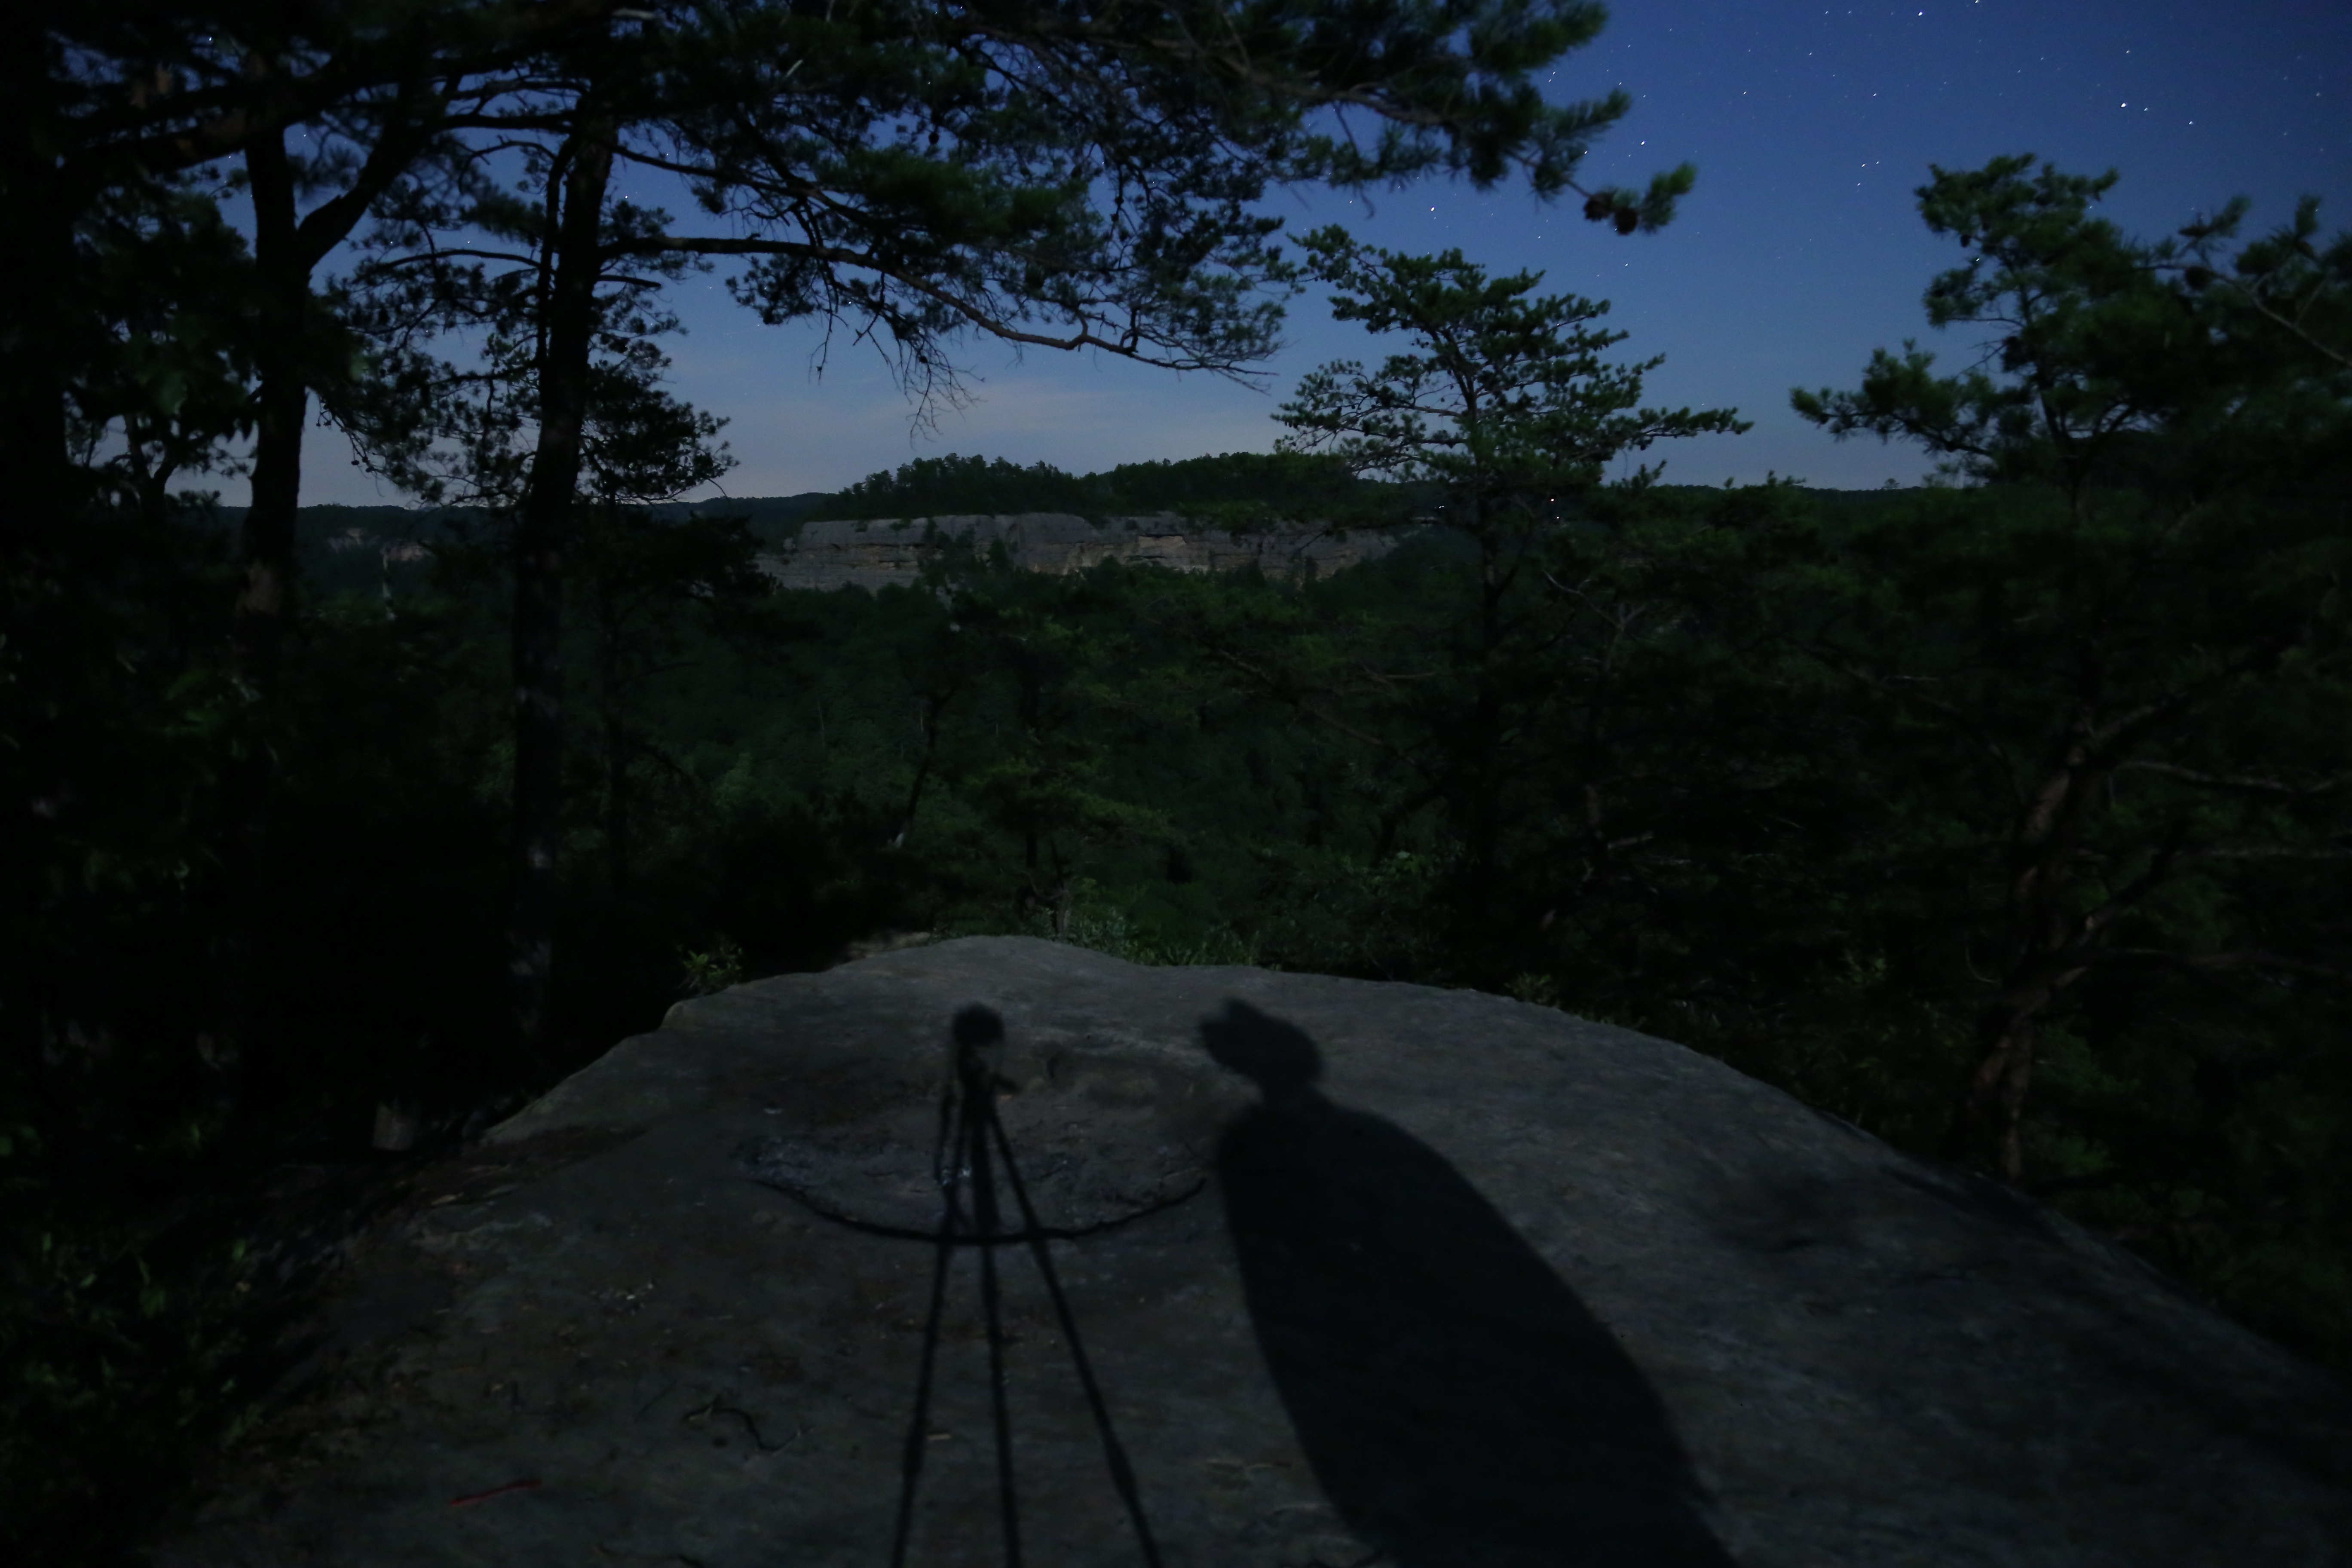
Night navigation is dangerous in areas with high cliffs.

Don’t panic and stay put if you really are lost:  If everything I have suggested here fails you and you believe you are lost, you need to stop, take a breath, and assess the situation.  Pull out your GPS, smartphone, or map and compass and perhaps after resting a few minutes to clear your head you will be able to figure out where you are.  If not, it is time to start thinking about shelter and other resources at your disposal, including ways to signal for help, but these are topics for another post.  If you really are lost and searchers need to be called in the worst thing you can do is wander aimlessly.  Stay put!  If you rush around in a panic you might end up getting injured and you will ultimately make it harder for a search team to find you.

IMG_3567

How prepared are you to spend the night if you get lost?

As for the couple we helped that day, their two biggest problems were inadequate planning and a serious lack of awareness on the trail.  By their own admission they did not know the area very well and did not do much homework or come prepared with a good map.  On the trail, after they veered off course, they passed through two trail junctions, a trailhead and parking area, and crossed a gravel road all of which were marked even on the basic overview map they were carrying.  Had they been paying more attention, any one of these features should have alerted them to their mistake and allowed them to take corrective action sooner.  With a more detailed map they also would have had a few more opportunities to right their wrong because they could have seen where their route was either paralleling or crossing a creek and they would have had a better understanding of the terrain they were traversing.  In the end they were fortunate they remained on the official trails (there are many unofficial trails in Red River Gorge) and that their detour led them to a trailhead where they were able to find assistance.

How to Not Get Lost Infographic

© Todd D. Nystrom and Todd the Hiker, 2017.

Advertisement

Online Sources for PDF Topo Maps

If you venture outdoors, especially in more rugged and remote locations, you really need to take time to learn how to read a topographic map and use a compass to navigate, then make sure you carry them both when you go into the backcountry!  For anyone old enough to remember the days of ordering paper copies of the United States Geological Survey (USGS) 7.5 minute (7.5’) quadrangle topographic maps, quads for short, and waiting for these prized treasures to arrive via snail mail, or hoping you could find an outfitter nearby that had your needed maps in stock, the digital world of the 21st century is an amazing place!

There is a plethora of online sources for maps, guides, and reviews of hiking and backpacking destinations both popular and obscure.  Not only can you access this information in mere minutes from the comfort of home, you can also download high quality digital versions of many documents legally and for FREE!  We are not talking about bootleg copies created on a home scanner by some computer savvy geek with cheese-puff-dust encrusted fingers here; no, we are talking about direct access to the most accurate and finest cartographic sources on the planet beamed directly to an electronic device near you!

You might ask, “Why download and print a hard copy map when there are a number of excellent digital mapping programs and phone apps that make use of the GPS capability on your phone, as well as handheld GPS devices?” These are certainly great tools and something to make use of. Personally I do carry a handheld GPS, and occasionally use my phone for navigation; however, I still prefer a hard copy map for navigating as it is easier to read than a small screen and allows you to get a broader perspective of an area. In addition, batteries run out, devices get damaged, and GPS satellite signals are easily degraded or completely blocked by weather, terrain, and tree cover. When adventuring in more remote and rugged locations I never go without a good set of maps and my compass!

While there are many sources out there, I have chosen the three I use most frequently to review in this article.  All these sources provide downloadable USGS 7.5’ quads in PDF format.  For each source I have provided the link to locate and download maps, another link to a representative map (Slade, KY Quadrangle which encompasses part of the Red River Gorge Geological Area in the Daniel Boone National Forest) to use for your own comparison purposes, a list of what I see as the pros and cons for each one, and finally some tips for printing and using these maps.

In my quality assessments I used common sections of a map printed with a Canon PIXMA MX892 inkjet printer (this model is retired, but mine still works great so I am not ready to upgrade yet) on plain paper at the standard print quality setting.  I focused on printed maps for two key reasons.  First, and foremost, as I have already stated, I believe you should always carry a hard copy map (and compass) when in the backcountry because electronic devices can and do fail in critical situations!  And second, the onscreen display quality is equally good for all three sources, so I have no reason to comment individually on this aspect.

National Geographic Maps

  • Website link:  http://www.natgeomaps.com/trail-maps/pdf-quads
  • Sample map (Slade, KY Quadrangle):  http://pdf.quad.download.s3.amazonaws.com/37083g6.pdf
  • Approximate file size:  5-6 MB
  • Note:  While these downloadable quads are free, National Geographic also offers a number of hard copy trail and travel maps and guides for sale, a number of which are waterproof.  These are well worth looking into if you are planning a big trip to one of the areas covered.
  • Pros:
    • This is an easy to use website with an interactive map to locate and select specific maps, followed by a simple download process
    • The PDF files are formatted for printing on standard 8.5″ x 11″ letter size paper with each page containing grid markings and scale information in the margins which is the biggest benefit of these maps
      • Page 1 is a 1:100,000 scale index map of the quad
      • Pages 2-5 are standard 1:24,000, 7.5’ quads divided into four equally sized map sections formatted to fit a standard printed page
    • Shaded relief makes it easy to visualize the general topography of an area
    • Includes official hiking trails and other facilities in quads that cover national forests and national parks (at least for the ones I’ve looked at)
  • Cons:
    • Maps are based on older USGS quads, ranging from late 1970s to late 1990s for maps I have downloaded
    • The shaded relief feature is a pro from an overview perspective, but makes it more difficult to read map details like individual contour lines, roads, trails, and text on printed maps
    • These maps are copyrighted which is not an issue for personal use; however, they cannot be distributed freely, nor can you use the map images for blog posts and other purposes without permission.  This should not be a problem for most people, but it is why I have not included an image of one of these maps in this post.

United States Department of Agriculture Forest Service (FSTopo Map Products)

  • Website link:  https://data.fs.usda.gov/geodata/rastergateway/states-regions/states.php
  • Sample map (Slade, KY Quadrangle):  https://data.fs.usda.gov/geodata/rastergateway/data3/37083/fstopo/Slade_374508337_FSTopo.pdf
  • Approximate file size:  4-5 MB
  • Pros:
    • Easy to use website with an interactive map to locate and select specific maps followed by a simple download process
    • Includes significant detail of national forest facilities and hiking trails, not always found on standard USGS topo maps, though I am finding more of these details in the newer versions of USGS quads
    • Because these maps are produced by a US government agency, they are considered public domain and can be reproduced and distributed freely.  If you do include a section of a map in a blog post, or another document you should still cite the source as common literary courtesy, though.
  • Cons:
    • Only includes lands managed by the US Forest Service
    • Contour lines are faint and very difficult to read when printed (at least that is the case on my home inkjet printer)
    • Map must be printed in multiple sections to be printed full scale on standard 8.5″ x 11″ paper (see tips for printing and using maps below)

United States Geological Survey (The National Map Download Client)

  • Website link:  https://viewer.nationalmap.gov/basic/
  • Sample map (Slade, KY Quadrangle):  https://www.sciencebase.gov/catalog/item/5cd16ac0e4b09b8c0b7a2df8
  • Approximate file size:  30-70 MB
  • 2022 update: From the USGS website, “A new USGS web application enables the public to create custom topographic maps on demand. The online application is called topoBuilder and the output maps are known as OnDemand Topos.” This application allows the user to center their quadrangles on a desired location, rather than being constrained by the existing, fixed quadrangles to which most are accustomed. With this latest improvement you can significantly reduce the number of maps needed for a particluar area. For example, the Red River Gorge Geological area can now be captured by downloading two custom quads rather than four fixed quads (Frenchburg, Scranton, Slade, and Pomeroyton). These customized quads can take up to a few days to be generated and are then downloaded from a link emailed to the user. I have used this service several times and the email with the download link has typically been emailed within 24 hours.
  • Pros:
    • These are the most current US topo maps available and they are regularly updated. The most recent update to the Slade quadrangle was 2019, but other nearby quads were udated in 2022.
    • Highest resolution, best quality downloadable maps available (these are straight from the ultimate source)
    • These PDF files also include satellite imagery, shaded relief, countour lines, and many other layers that you can turn on and off as desired, this feature is available in the current version of Adobe Reader.
    • Of the three sources discussed here, the individual contour lines on these maps are the easiest to read when printed (see photo below for a comparison of US Forest Service and USGS maps)
    • Generally these maps are public domain with no copyright restrictions; there are a couple minor exceptions but, “even those that include commercial data, may be reproduced freely and used for any purpose, provided copyright notices…are retained.”  Full details can be found here: Are USGS topographic maps copyrighted?
    • Historical topo maps dating back several decades to over a century are also available from the USGS website. I find these maps useful for locating features no longer marked on newer maps such as old logging roads, that can make off-trail navigation and travel easier, and abandoned structures, that make interesting sites for adventure and exploration
  • Cons:
    • More complicated website, the process to locate and download maps is not as intuitive as the other two sources (if needed instructions can be found here: US Topo Map Users Guide
    • Some maps I have downloaded do not include all the hiking trails and facilities in national forests and national parks, although I am finding newer versions of the USGS maps do included this information.
    • Maps must be pieced together when printed full size on standard 8.5″ x 11″ paper (see tips for printing and using maps below)
img_6960

Comparison of a printed section of the 7.5′ Pomeroyton, KY Quadrangle maps from the US Forest Service (left) and USGS (right).  The US Forest Service map includes details on trails and facilities, while the USGS map has much more readable contour lines.

Tips for Printing and Using Maps

Note:  this method assumes a moderate level of computer literacy and skills using Microsoft PowerPoint or some similar software application.  Describing the computer and software application skills needed is beyond the scope this article.

  1. Set the zoom magnification to at least 100% in your PDF reader (I typically use something between the 100% and 150% zoom setting depending depending on whether I want more area coverage on a page or clearer details).
  2. Center the screen view on the area of the map you want to print and capture a screen shot of that section.
    • If the area of interest will not fit on a single screen you can use a lesser zoom magnification or you can capture multiple screen shots and print your map on multiple pages.
    • I typically create multiple detailed pages at a higher zoom magnification, and then print a smaller scale overview map of the larger area that fits on a single page.
  3. Paste the screen shot into PowerPoint where you can crop, size, and format it properly for printing, as well as overlaying your own information such as campsites, emergency phone numbers, and other details you might find useful on the trail.
  4. It is important to ensure you capture a screen shot of the map scale at the same zoom magnification as your other map images so you can incorporate it in your customized printed version, and be aware that if you enlarge or shrink your map images you also need to enlarge or shrink the map scale image at the same time to ensure they remain scaled identically.
  5. I also recommend capturing an image of the UTM grid coordinates around the margin unless your map image already includes the edges with this information. I usually trying to maximize area coverage on my maps so I just grab a quick screen shot of the margins that I can use for reference and then I actually overlay my own text so I can position it for minimal interference with the actual map.
  6. You should also capture other marginal information such as legends, magnetic north declination, and the UTM zone designation to incorporate in your map, but the scale of this information is not critical and can be sized to fit as desired.
  7. Finally, you can print out your maps on waterproof map paper, purchase a waterproof map case, or do what I usually do, which is to print them on normal paper and seal them in a zip-top bag, to ensure they remain dry and readable while on the trail.

An example of one of the customized maps I created for our 2018 backpacking trip to Pictured Rocks National Lakeshore in the Upper Peninsula of Michigan. This 42 mile trip required twelve 8.5″ x 11″ landscape oriented pages to get the desired level of detail and readability. Having maps with customized details like campsites, daily mileage, and much more was quite valuable on this multi-day adventure.

© Todd D. Nystrom and Todd the Hiker, 2017-2022.

Hiking Devils Garden – Arches National Park

Arches National Park is a treasure trove of incredible landscapes and amazing geological features. According to the National Park Service website, “the park has over 2,000 natural stone arches, in addition to hundreds of soaring pinnacles, massive fins and giant balanced rocks.” The Devils Garden Trail includes all of this and offers the most challenging hike in the park, even for a seasoned hiker.

Arches is not considered a backcountry park, other than a few outlying areas accessible only in a high clearance vehicle, but this trail is your best chance of getting away from the crowds, even if it is only for short periods of time. This is the longest trail in Arches National Park. The NPS brochure for this hike places the total distance at 7.2 miles, including all of the side trails to the various arches and the primitive trail. It also includes some reasonably challenging rock scrambles, several steep climbs/descents, and narrow sections of trail with significant drop offs. If you reach a point where you do not feel comfortable traversing the terrain, I recommend you turn around and return via the primary trail. We encountered a number of hikers who did just this on the day we were there.

For your own safety and the protection of the sensitive desert landscape, stay on the trails! The sandstone fins are an amazing feature in the Devils Garden landscape, but they also present some interesting challenges to navigation. Pay close attention to the cairns that mark the way, especially on the primitive portion of the loop. Generally, the cairns are not too difficult to find, but make sure you locate the next cairn before you proceed, and backtrack to the last marker you observed if you are unable to find your way forward

At one point on the primitive trail it is possible you will encounter a pool of water that you will need to cross depending on the season (it was waist deep when we visited in mid-May). You will either need to drop into and wade through the water or scramble over the steep rock to one side. We chose the rock scramble which proved quite a challenge. It could easily have resulted in a dip in the pool we were attempting to avoid, but we successfully navigated the obstacle and remained dry in the process.

If you plan to do the full loop, I recommend following the primary trail out to Double O Arch and Dark Angel first and returning via the Primitive Trail. This allows you to visit most of the major landscape features first, just in case you encounter a section of the trail where you are not comfortable proceeding due to difficult conditions or your own skill level.

Don’t forget to pack plenty of water and enjoy the hike!

The first two arches you will encounter are Tunnel Arch and Pine Tree Arch both of which are accessible down a side trail that adds 0.5 miles to the total hike. Even though this is a short and easy trail, I suggest visiting these arches on the outbound trip as you may be inclined to bypass them if you are too tired on the return trip.

IMG_6432

Tunnel Arch

GOPR0080-0001

Pine Tree Arch

The next landmark you will encounter is Landscape Arch one of the best known arches in the park. Now at this point in the trail you will likely be thinking, “this is easy!” You may also be wondering if it is possible to escape the crowds, especially during busier times of the year. Not to worry, keep hiking because there is plenty of great scenery ahead, and the farther you go, the more likely you are to escape the crowd.

IMG_6438

Landscape Arch

Just past Landscape arch you will encounter the first obstacle that will cause some to turn back…we witnessed this when one member of a party decided they would rather return to the trailhead than continue on. At this point on the trail this is a perfectly safe thing to do, even for an individual person. The scramble up the relatively steep face of this sandstone fin is not really that difficult; however, if you have a fear of falling or a poor sense of balance it can be rather intimidating.

GOPR0081-0001

Climbing a steep fin…the first major challenge

Shortly after reaching the top of this fin you will encounter a side trail that leads to Partition Arch and Navajo Arch. This trail adds an additional 0.8 miles to the hike and like the other side trails is worth the effort.

IMG_6446

Partition Arch

IMG_6452

Navajo Arch

On the next section of trail, you traverse the top of a narrow fin with a serious drop off on both sides. For anyone with a fear of heights this will be a challenging section of trail, but the views are worth it! Descending off the fin also takes a bit of strategy so keep an eye out for markers that indicate the way down, as it is not the easiest route to find.

GOPR0085-0001

Traversing the top of a narrow fin

 A little further along you will encounter Double O Arch. The area under the arch was closed off when we visited due to a large chunk of rock breaking off and falling away from the arch a few weeks earlier during a period of significant rain…just part of the ever changing landscape.

IMG_6466

Double O Arch

The next landmark to visit is Dark Angel, a towering pinnacle, that requires an out and back side trail of 0.8 miles round trip, though I highly recommend not skipping this as the sweeping views at the end of the trail are well worth it!

IMG_6471

Dark Angel

IMG_6473

The amazing view looking back from the end of the Dark Angel trail

After backtracking on the Dark Angel trail, you have the option to return to the trailhead via the primary trail by which you came, or you can complete the loop on the Primitive Trail. If you found the main trail was intimidating and pushed your limits, then I do not recommend taking the Primitive Trail. If you are up to the challenge the effort is worth it, and make sure you don’t miss the only side trail out to Private Arch.

IMG_6480

Private Arch

Even though you won’t completely escape the crowds, especially on the easier portions of the trail, this hike is a must do for any serious hiker visiting Arches National Park. You can hike nearly all of the shorter trails in the park in the span of a single day, but make sure you carve out at least half a day (more if you are a photography buff) to do the entire Devil’s Garden Trail, including the Primitive Trail if you are up for the challenge!

IMG_6504

View from the back side of the Primitive Trail, looking up at the fin we crossed earlier in the hike…those are hikers up there!

© Todd D. Nystrom and Todd the Hiker, 2016.

Enter by the Narrow Gate

“Enter by the narrow gate. For the gate is wide and the way is easy that leads to destruction, and those who enter by it are many.  For the gate is narrow and the way is hard that leads to life, and those who find it are few.” ~Matthew 7:13-14 (ESV)

IMG_6480Private Arch, Arches National Park, Moab, Utah.

Private Arch is located on a side trail off the Devil’s Garden Primitive Loop in Arches National Park.  As the name Devil’s Garden suggests, this trail traverses a fairly harsh landscape and the primitive loop is an even more challenging trail that fewer visitors to Arches NP actually hike.  On the day we visited, private is exactly what we got.  Though the parking lot at the trailhead was bustling with visitors, and the easier sections of the Devil’s Garden trail were filled with a continuous stream of hikers, because we chose to take “the road less travelled,” we really had an opportunity to spend a little extra time enjoying the beauty and solitude of this hidden little corner of God’s creation.

Like the passage from Matthew’s gospel suggests, good things don’t always come easy.  Whether it is enjoying the beauty and solitude of a remote, less visited place in a busy national park, or the eternal life offered by following our Lord and Savior, Jesus Christ, the best destinations often require us to travel a more difficult path.

If you want to find your way to the less visited, scenic corners of our amazing national parks you either need to hire a guide who knows the trails or have a good map and the skills to read and follow it.

In our Christian walk we are equipped with the best map available, the Bible.  But more than that we have the Master guide himself, who has gone before us, paying the price for our sins, and who through His mercy and grace is ready to show us the way.

Christ is the narrow gate through which we enter, and though the path may at times be hard, the reward of this challenging journey is nothing less than eternal life with our Master in His glorious kingdom!

Yours in Christ,
Todd the Hiker

© Todd D. Nystrom and Todd the Hiker, 2015.