
This gallery contains 51 photos.
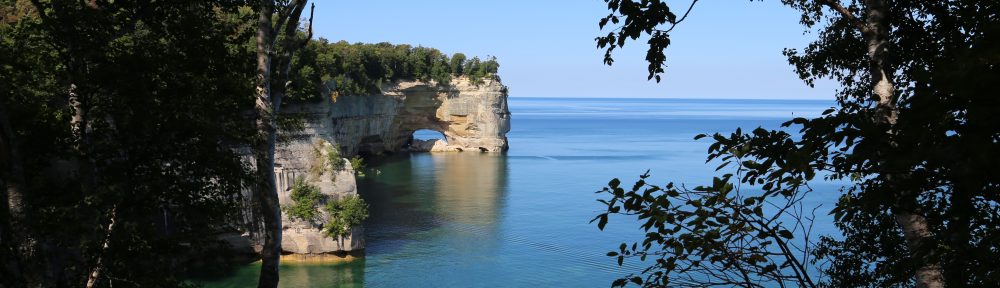
Pictured Rock National Lakeshore: Photo gallery highlights from our 42.4 mile backpacking journey across Pictured Rocks National Lakeshore, Michigan, September 9th through 14th, 2018. Continue reading
This gallery contains 51 photos.
Pictured Rock National Lakeshore: Photo gallery highlights from our 42.4 mile backpacking journey across Pictured Rocks National Lakeshore, Michigan, September 9th through 14th, 2018. Continue reading
 If you have flown anywhere in recent years you likely know the list of items you cannot bring along in your checked or carry-on luggage is rather extensive. For the average business or vacation traveler the challenge of packing is complicated enough; however, for those of us who like to spend our vacation time tromping through remote wilderness locations with a backpack full of gear, the challenge is even greater!
In this article I will focus on domestic air travel in the US, not to exclude anyone, but rather because the rules and regulations of international air travel include not only the safety and security concerns of our own US Transportation Security Administration (TSA) but also those of similar agencies in other nations. Keep in mind that customs and immigration laws unrelated to air travel safety will also apply, so even if an item can be transported in a carry-on bag, it may not be legal to bring that item through customs; for example many countries, including the US, ban the import of certain food items. My only recommendation, if you are planning an international trip, is to start your research early.
Do I Need to Check Baggage?
The short answer is yes! If you are flying and bringing your own gear it is safe to assume you will need at least one checked bag for your gear if you are day hiking, and likely one checked bag per person if you are backpacking. You need to research the checked baggage policies and fees when booking your flights as checked baggage fees can add up quickly, often $30 or more, per bag each way depending on the airline. Some carriers like Southwest Airlines still offer two checked bags per ticketed passenger at no extra charge. With their already low prices for airfare and the bonus of not having to pay extra for checked bags they are my personal favorite for our adventure travels whenever routes and schedules allow!
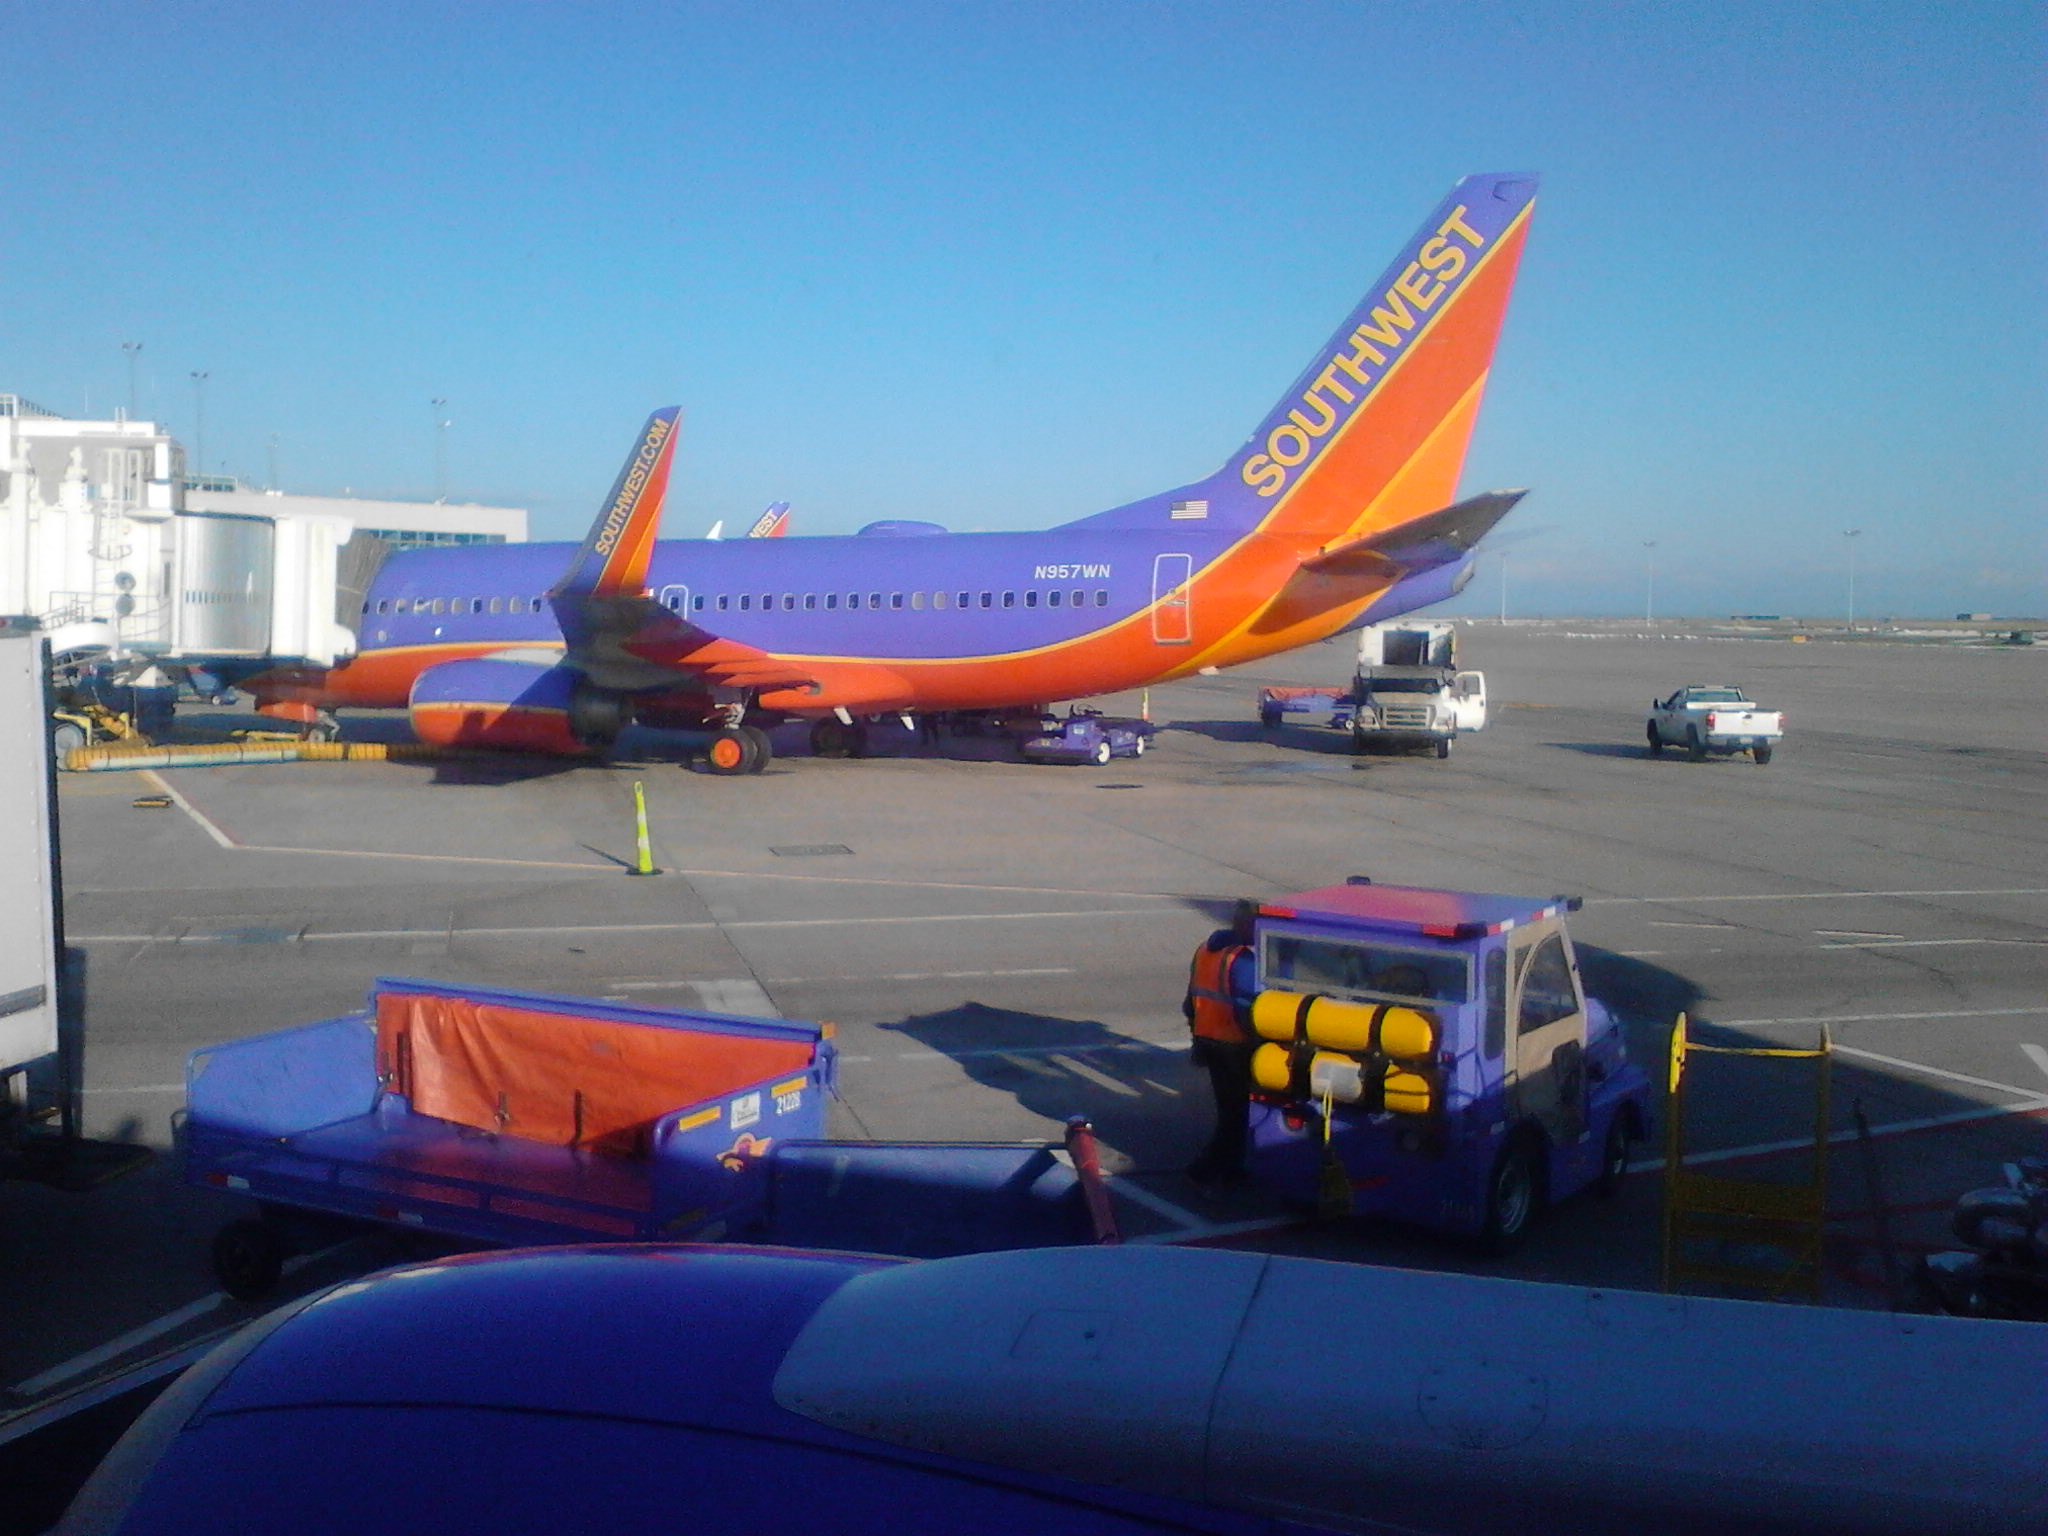 On the ground at Denver International Airport
Other Gear Transport Options
There are other options such as shipping your gear via a land based carrier, though, based on what I have paid to send Christmas gifts through various shippers in the recent years, the costs are significant, and restrictions still apply. In addition to the cost, there are many logistical and timing issues you will need to work through if you go this route. Another option I will mention is working with an outfitter who rents gear at, or will ship it to, your destination. I have done a cursory look around the internet and know there are a number of companies who do this, but cannot comment on the cost or availability of these services, which I expect vary significantly depending on where your adventures take you and what time of year you travel. Even if you use one of these options there are still items you will need to purchase at your destination, so planning and research are always a must.
Special Considerations
If you have special dietary needs or require special medical equipment, supplies, or medications you need to do your homework regarding air travel restrictions. If there are items you plan to purchase at your destination, I expect most cities large enough to have an airport will also have places to purchase whatever you need, but do not take this for granted, especially in more remote destinations. Spend some time on the internet researching options, and by all means, follow up with a phone call, especially for highly specialized or critical items.
Planning Ahead and Preparing to Pack
Start gathering your gear at least two weeks before your trip. Our dining room becomes a staging area for gear before any backpacking trip, but this is especially true for our trips that include air travel. Waiting until the last minute is a sure way to forget a critical piece of gear or leave something in a carry on bag that causes TSA agents and local police to take unwanted interest in you at the security check point! The later situation is certain to result in confiscation of the overlooked item, like a favorite pocket knife or multi-tool, or still worse, it could turn into a complete search of your person and baggage, a missed flight, and potentially a fine or even arrest, depending on what the item is.
 Backpacking gear gathered in our dining room before a trip.
Check all the pockets in your backpacks and clothing to make sure there isn’t a spare lighter, fire starter, knife, or some other restricted item tucked away. And keep in mind that some outdoor clothing lines have hidden pockets and compartments for survival gear built into their clothing, so extra diligence is warranted with these types of items.
Packing Your Bags
The weight limit on checked bags is generally 50 pounds, with additional fees for oversize and overweight bags. As you pack your gear consider the fit as well as weight of each item. Once your bags are packed you should weigh them and make adjustments as needed.
 Packed bags ready for weighing.
Having more than one checked bag gives you flexibility as you can shift items between bags to balance the weight and keep them all below the limit. If you check only a single bag you will need to closely watch the weight or just plan to pay the overweight baggage fee.
 Hanging the bags on a luggage scale to ensure they are within the weight limits.
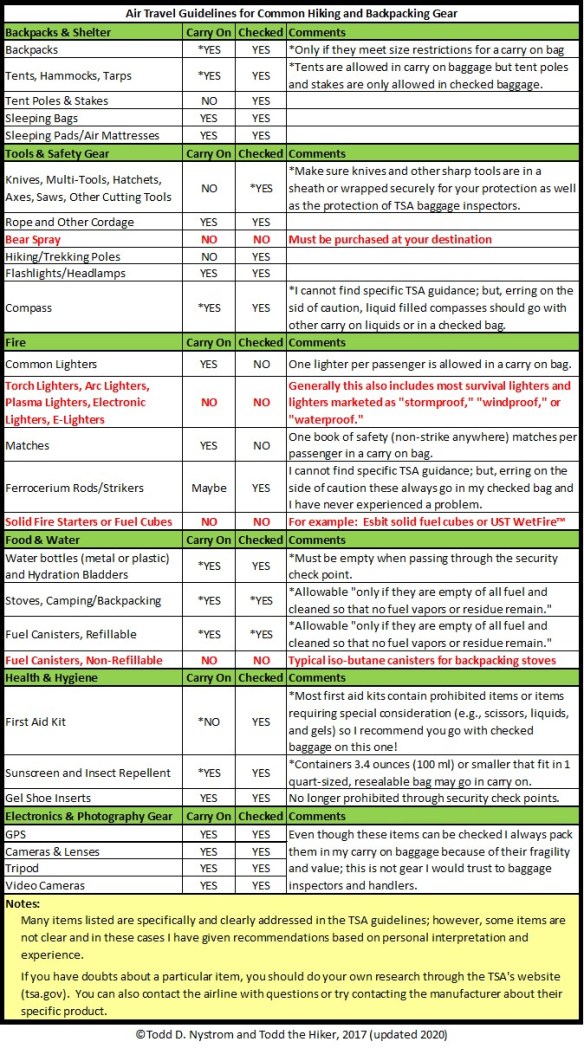
Guidelines for Specific Items
The table below is my attempt to cover the some of the most common items hikers and backpackers might carry. Though this is certainly not an exhaustive list, I have tried to make sure I included any gear I personally had questions or concerns about in the past. With a few items I could not find specific TSA guidelines. In those cases I have given my personal interpretation and practices which err on the conservative side, as I prefer the no hassle approach and would rather not risk losing valuable gear. As their website says on practically every page related to security guidelines, “The final decision rests with the TSA officer on whether an item is allowed through the checkpoint.”
If you have other items you are concerned about I suggest going to their “What Can I Bring?” page that allows you to search for guidelines on specific items yourself (their MyTSA App also has this feature). They also have an “AskTSA” service that allows you to send a photo of an item and ask questions through Facebook Messenger or Twitter (8 a.m. to 10 p.m. ET weekdays; 9 a.m. to 7 p.m. weekends/holidays). If you exhaust all these resources and still have questions, I suggest contacting the manufacturer of the item as they are likely to be aware of restrictions that apply to their products.
At Your Destination
Another practice I recommend is taking time before your trip searching the internet for outfitters, grocery stores, and other vendors where you can purchase supplies once you arrive at your destination. This saves time, allows you to find the stores closest to your road travel route, and gives you an opportunity to call ahead to check hours and make sure any special items you need are available.
We tend to purchase most of our supplies in the cities where our flights take us. Cities with airports tend to be larger so the stores have a better selection and usually cheaper prices. That said, the stores we have patronized in and around the national parks have not had significantly higher prices. And, although the selection of items is usually limited, you should have no problem finding the basics of food, water, and fuel. Taking the time to do a little research in this area will save you time, frustration, and disappointment which is not what any of us want when we are tired from spending hours airports and sitting on a plane!
Final Advice
If you want to avoid hassles, delays, or the confiscation of an important piece of gear, I strongly suggest you err on the conservative side and leave questionable items at home or plan to purchase them at your destination. Consider every item you take, large or small. And, finally, make sure you check and double check your gear to ensure you don’t forget anything critical or leave a restricted item in a carry on or checked bag that will cause problems going through security screening at the airport.
Travel safe, hike safe, and by all means get out there and explore this vast, amazing, and beautiful world that God has blessed us with!
Happy Trails!
Todd the Hiker
© Todd D. Nystrom and Todd the Hiker, 2015-2020.
Relevant TSA Website Links:
What Can I Bring?: https://www.tsa.gov/travel/security-screening/whatcanibring/all
Liquids & Gels: https://www.tsa.gov/travel/security-screening/liquids-rule
MyTSA App: https://www.tsa.gov/mobile
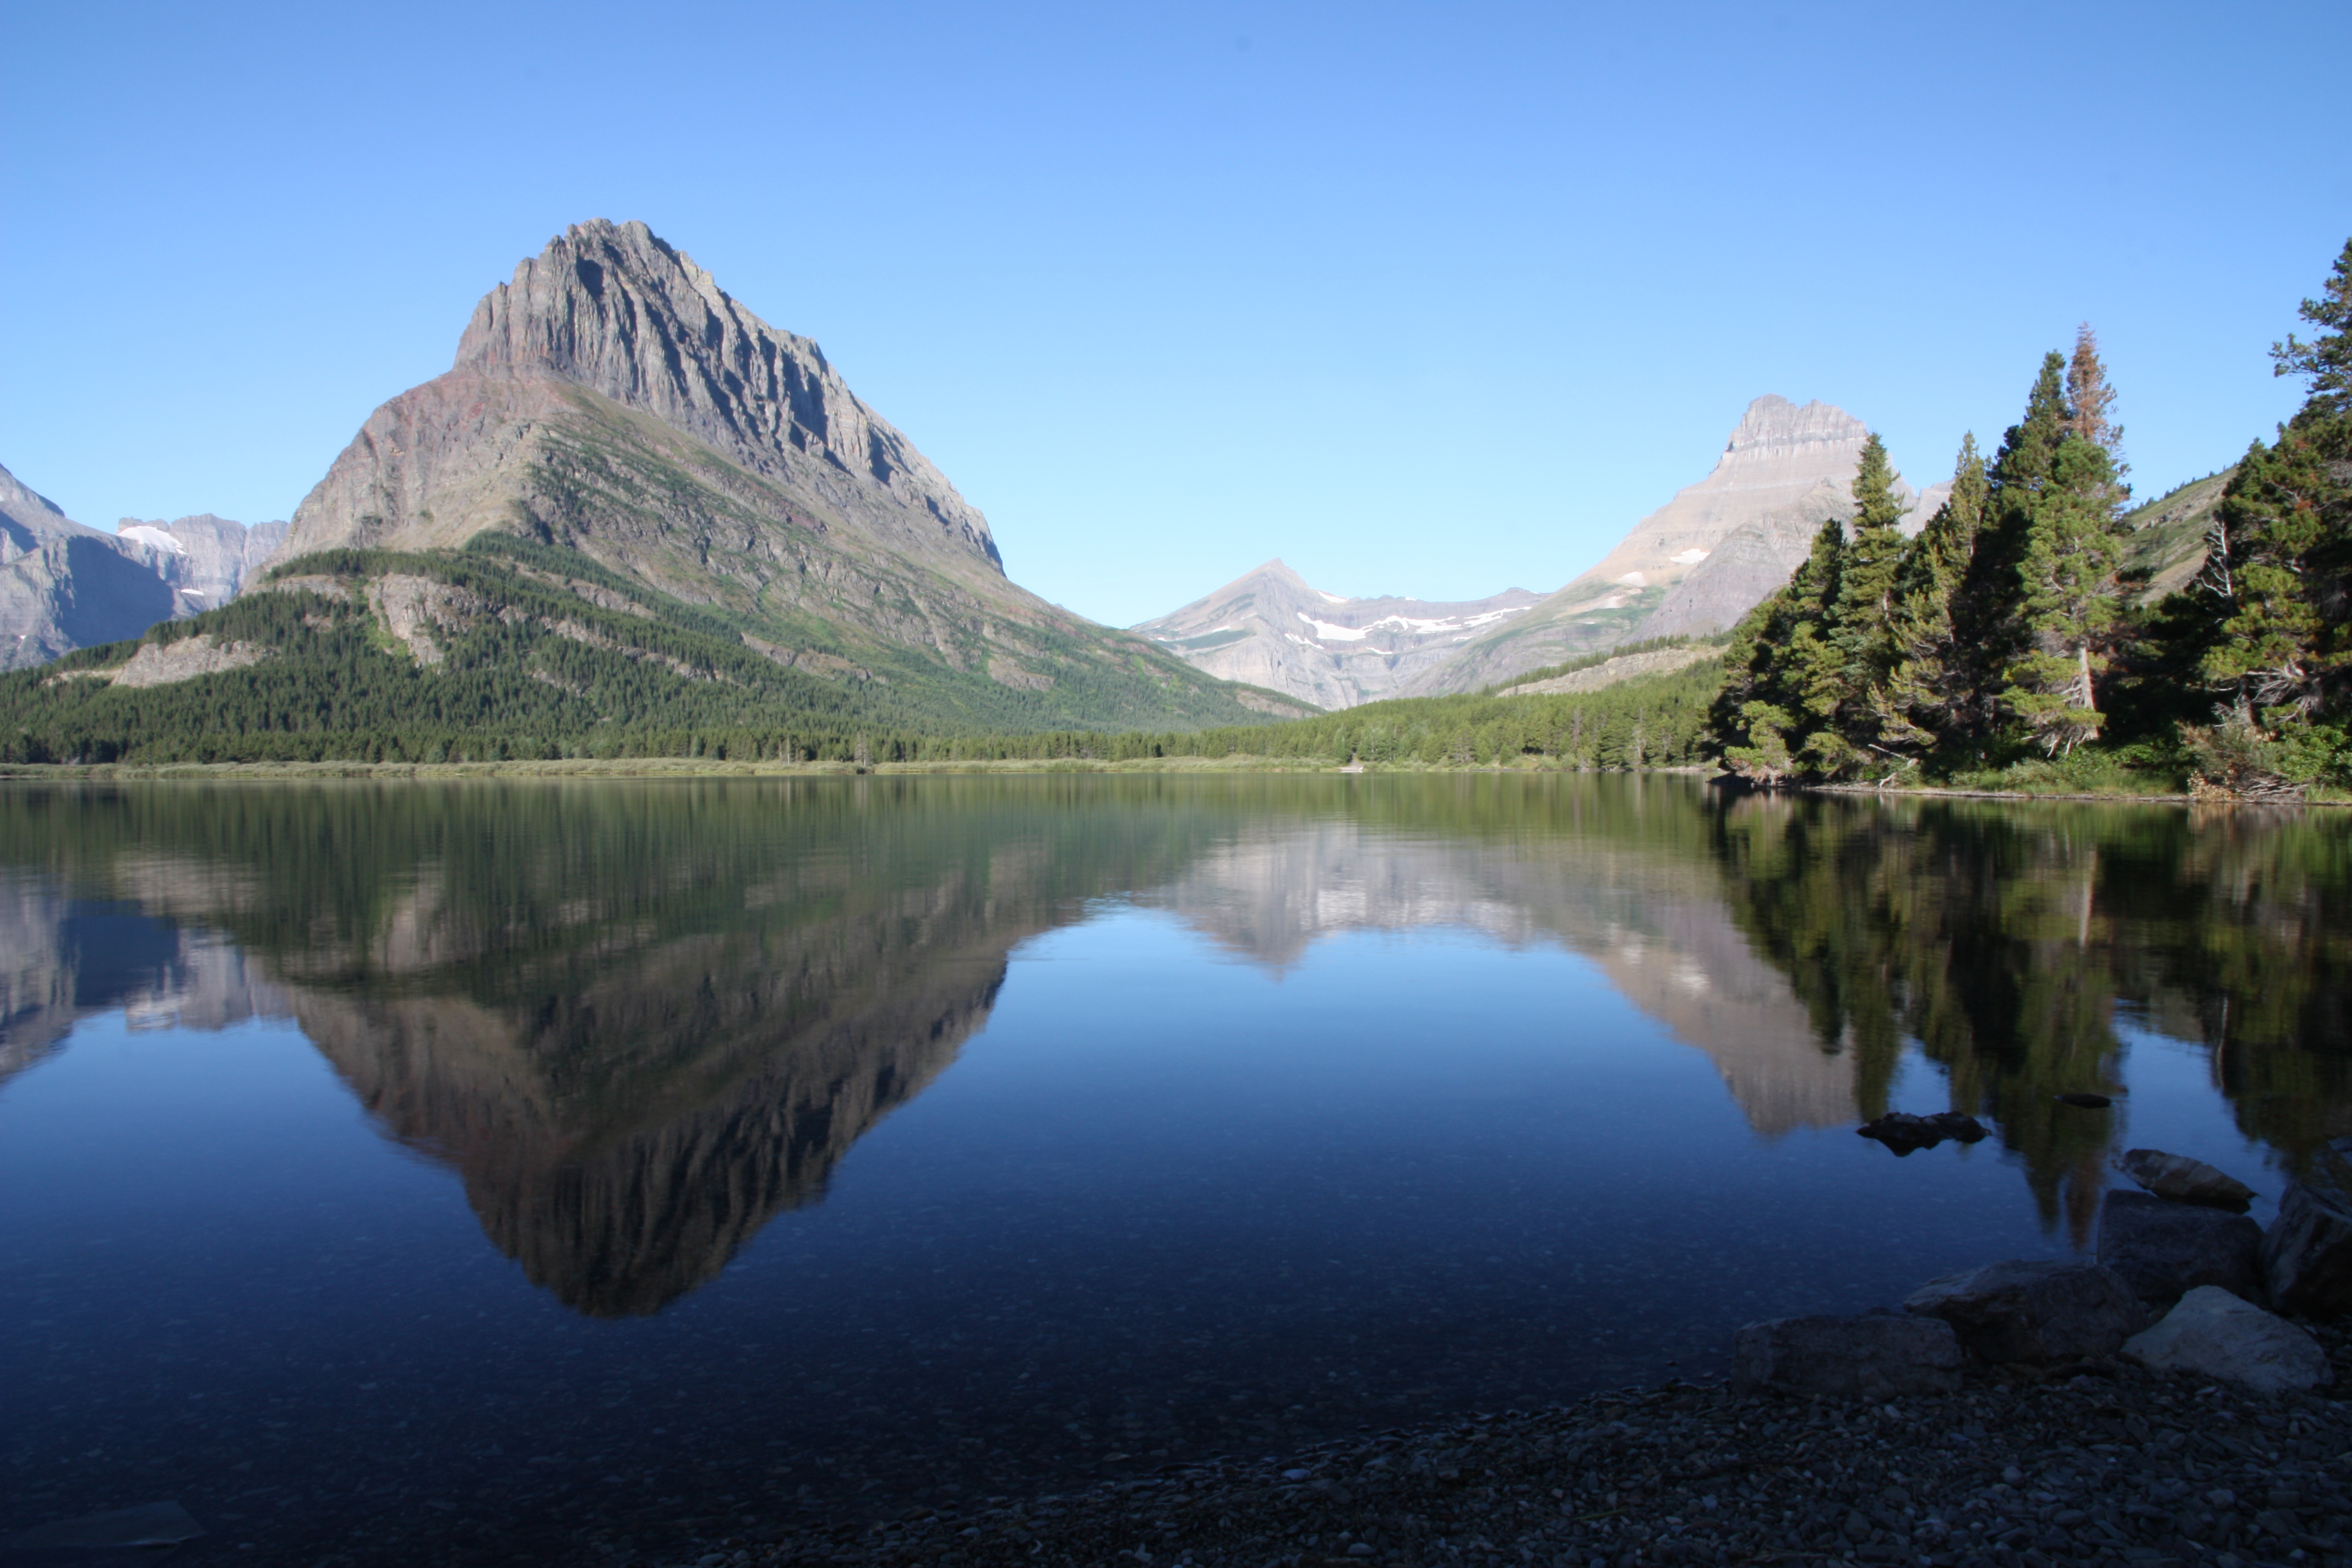
Morning mountain reflection on the still waters of Swiftcurrent Lake in the Many Glacier area of Glacier National Park.
The vastness of Glacier National Park is incredible! Its beauty is impossible to capture in mere words, and photographs only partially convey the wonders we discovered in this amazing corner of God’s great creation. It really needs to be experienced in person to be fully comprehended!
Traveling to Glacier National Park
Glacier National Park is located in northwestern Montana and borders Waterton Lakes National Park (Canada) in the southwestern corner of the province of Alberta. If you plan to visit Canada bring your passport and do some research so you know what items you are allowed to bring with you going into Canada, as well as returning to the US.
The closest airport is the aptly named Glacier Park International Airport in Kalispell, Montana, about 30 miles from the western entrance of the park. Also, Kalispell is a large enough city to find any gear and supplies you might need for your adventure at reasonable prices. The tables and chart below will help orient you with the area, and also provide drive times and distances between major areas around the park, as well as to other airports in the region.
When to Visit
While you can visit Glacier any time of year, keep in mind much of the park is inaccessible in the winter, and the season when all the roads are open is relatively short. Going-to-the-Sun Road, the only road that fully spans the interior of the park from east to west, typically opens in early July and closes in late October; but, I highly recommend checking the Alerts and Current Conditions page on the official NPS website regardless of when you plan to visit as heavy snows and construction often affect the opening and closing dates. Also, peak visitor times and the best season for road construction typically coincide in many national parks; for example a major project in 2020 and 2021 will significantly increase travel times to and from the Many Glacier area during both of those summers. By planning ahead, arriving early, and taking park shuttles when and where available you can hopefully minimize the impact during your visit.
Where to Stay
Whether you plan to stay in one of the grand old lodges, a rustic cabin, a front country campground, or do some backcountry camping, there are plenty of options available. The one common element, regardless of your choice, is the need to plan well in advance of your trip. The lodges book early; and, while there is a mix of reserved, as well as first-come-first-serve campsites, you want to know what to expect. Rather than going into great detail here I suggest starting your research at the following pages on the NPS website:
Lodging: There is a variety of lodging options in and around the park, though the prime months of July and August book up quickly, so make reservations as early as possible. We booked in January for a mid-August trip and could only find openings in the East Motel of the St. Mary Lodge & Resort. The room was clean and adequate, but very small with no frills, and quite expensive! Remember you are paying for the location, and hopefully you haven’t traveled all this way just to sit around in your hotel room! The food and service were good and the stores appeared to have everything you might need at fairly reasonable prices, though we had stocked up in Kalispell before heading to the park, just in case.
Camping: There are 13 campgrounds with over 1000 sites.
Backcountry Camping: As with any national park, if you plan to go backpacking and backcountry camping many regulations apply and permits are required, so you really need to do your homework.
Be Prepared
Glacier National Park is a vast wilderness and, depending on which trails you hike, the number of people you encounter can vary significantly. Even on the busiest trails we sometimes went a while without encountering other hikers. Also, do not expect to be able to use your cell phone to call for help as service fades quickly once you enter the park.
As with any mountain wilderness outing, you need to be equipped with proper clothing, gear, and supplies, including extra warm layers, raingear, a hat, sunglasses, and sunscreen, some form of makeshift shelter, sufficient water and/or a way to purify water, food, first aid kit, flashlight or headlamp, whistle, emergency fire starting materials, and, finally, a good map and compass.
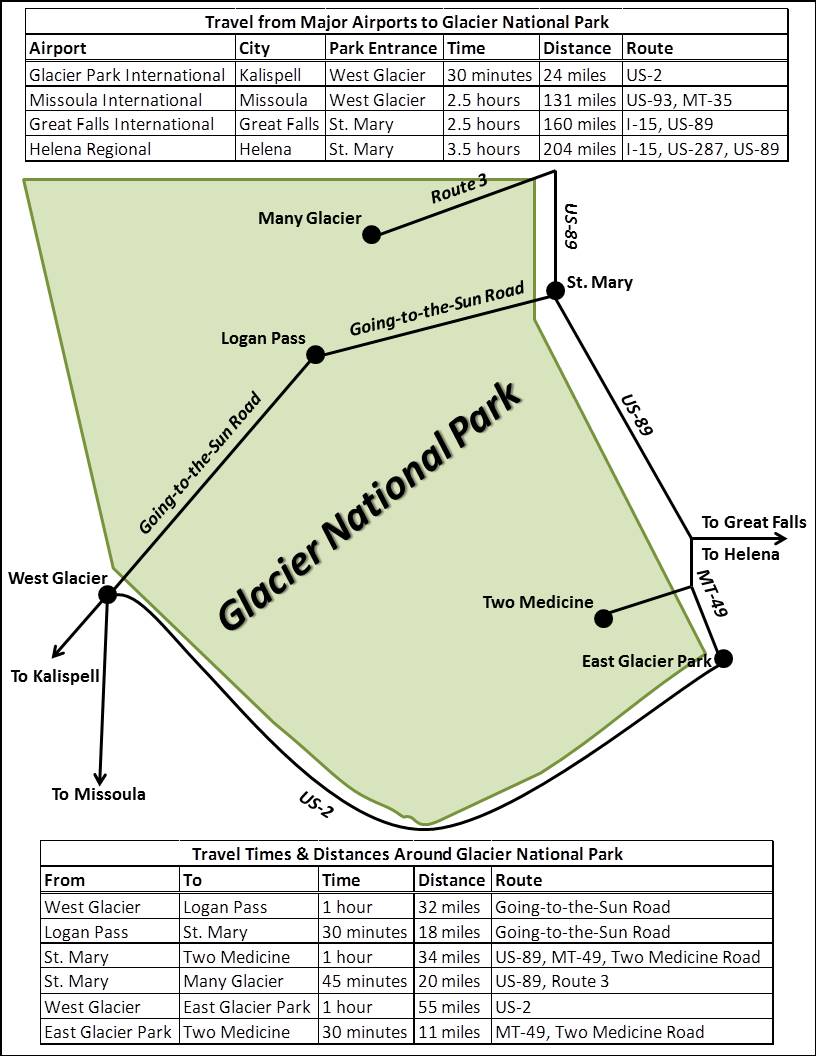
Grizzly bear eating berries along the Iceberg Lake Trail.
This is also bear country, home to both grizzly and black bears. We saw several of both during our visit, most from the safety of our vehicle, though we did encounter one grizzly, about 30 yards away, while hiking the Iceberg Lake Trail. Read up on bear safety, heed the recommendations to not hike alone, and have every adult carry bear spray. Also, be aware if you are traveling by air, you cannot transport bear spray in either your carry-on or checked luggage so you will need to purchase it upon arrival. All the stores in and around the park had bear spray for sale, though I did some research when we took our trip and found a used sporting goods store in Kalispell where we were able to purchase bear spray for $25 a canister and return it for a $10 refund (2012 rates), assuming the canister was not discharged. The store we used is now closed, but considering a canister of bear spray currently costs around $50, taking time to do some some online research and calling around could save you a bit of money.
There are five major areas of the park including, Lake McDonald, Many Glacier, North Fork & Goat Haunt, St. Mary (includes Logan Pass), and Two Medicine. We did not do any hiking in the Lake McDonald Valley, though we did drive through on Going-to-the-Sun Road, but never even came close to remote North Fork/Goat Haunt area.
There is a great shuttle system with numerous stops along Going-to-the-Sun Road that is available at no extra cost. This is a convenient way to do some point-to-point hikes along Going-to-the-Sun Road. It is also a great way to get to Logan Pass without the concern of finding a parking spot; plus, you get to watch the scenery along the way rather than the road and other vehicles. Pay close attention to the shuttle times, though, especially later in the day, as you do not want to get stranded at the end of a long hike without a way back to your vehicle, except a long walk in the dark.
In all, we hiked about 45 miles over seven days and barely scratched the surface of the 740 miles of trails Glacier has to offer. As I said earlier mere words cannot do justice to this magnificent place, so I will provide only brief technical information about each hike and let the my photographs do the rest. All the trails we hiked were well marked so navigation was not difficult, though having good topographic maps will provide an added measure of confidence.
Highline Trail to Haystack Butte from the Logan Pass Visitor Center; 7.2 miles out-and-back; some ups and downs along the way with a significant climb at Haystack Butte.

Bighorn sheep ram charging down the narrow Highline Trail and frightening hikers near Logan Pass.

Indian paintbrushes with Haystack Butte in the background.
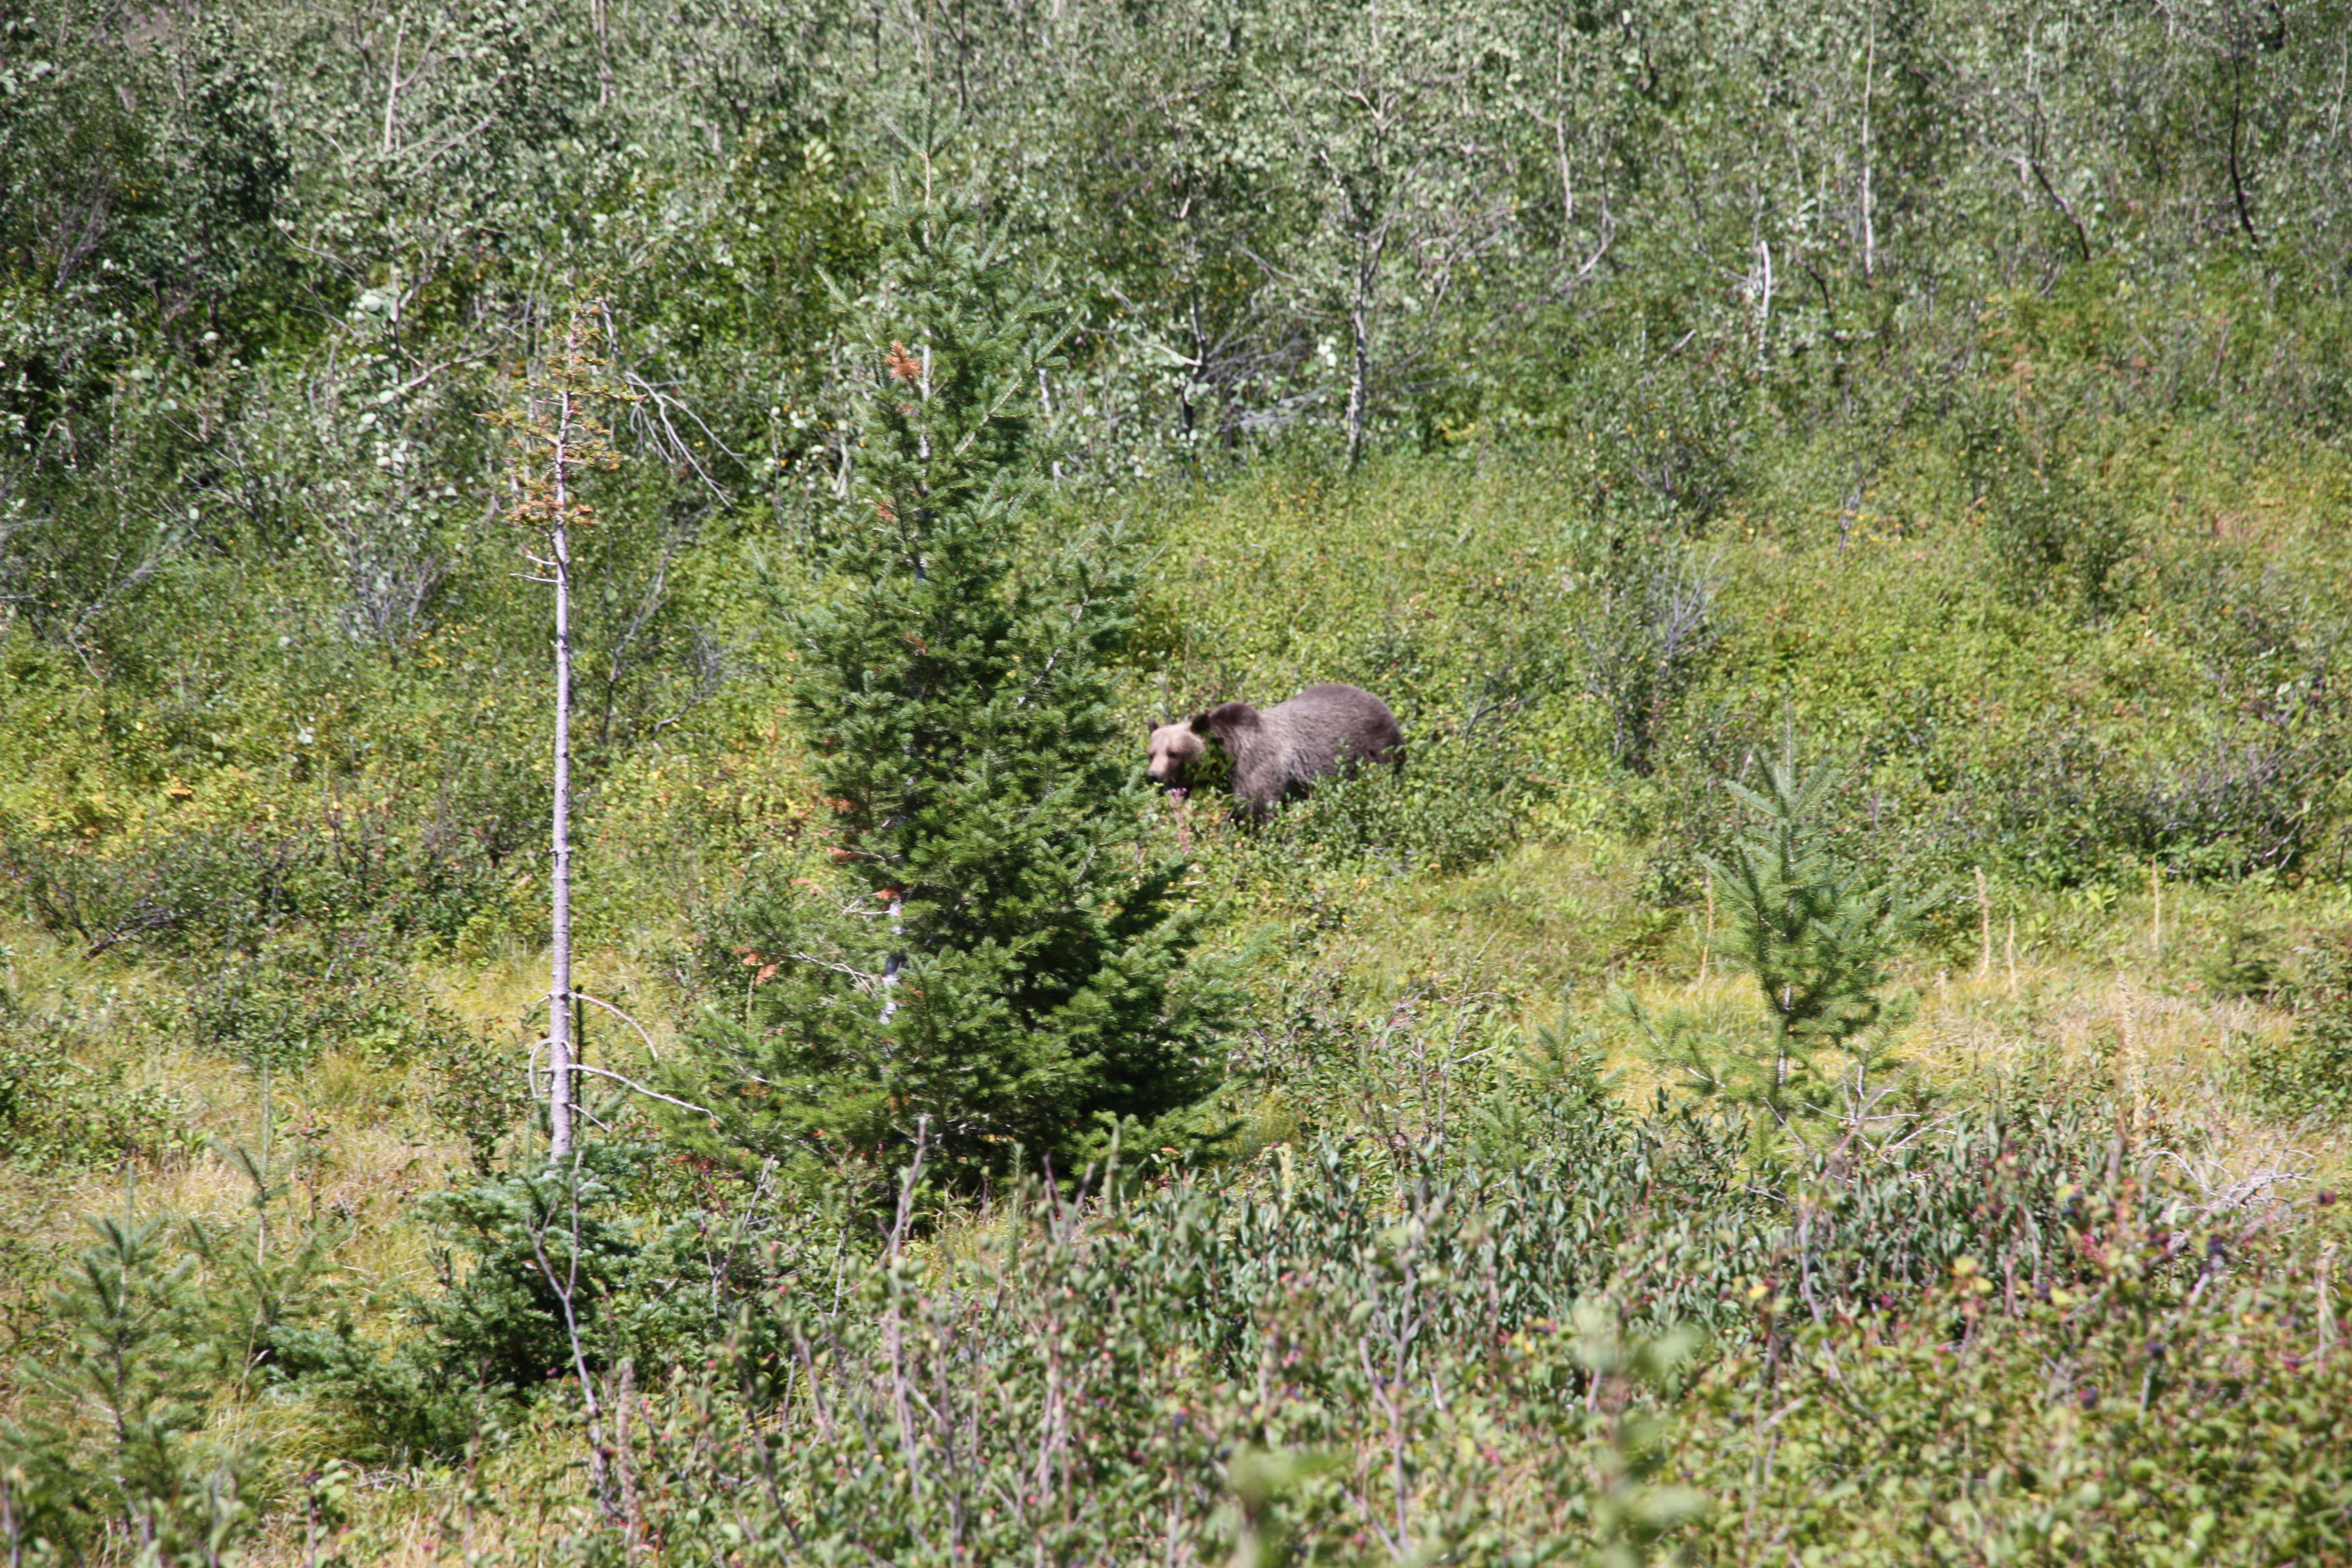
St. Mary Falls & Virginia Falls from the St. Mary Falls trailhead (St. Mary Valley); 2.9 miles out-and-back; some minor ups and downs along the way with a moderate climb to get up to Virginia Falls.
St. Mary Falls.

Posing in front of Virginia Falls.
Siyeh Bend to St. Mary Falls from the Siyeh Bend/Piegan Pass trailhead on Going-to-the-Sun Road just east of Logan Pass; 5.0 miles one-way with a return trip via the park shuttle. There is about a mile of uphill hiking at the beginning of this route, but then it is all downhill except a brief, easy climb to the St. Mary Falls trailhead and shuttle stop at the end.

Todd the Hiker at the Siyeh Bend trailhead. (Photo credit: Leah Nystrom)
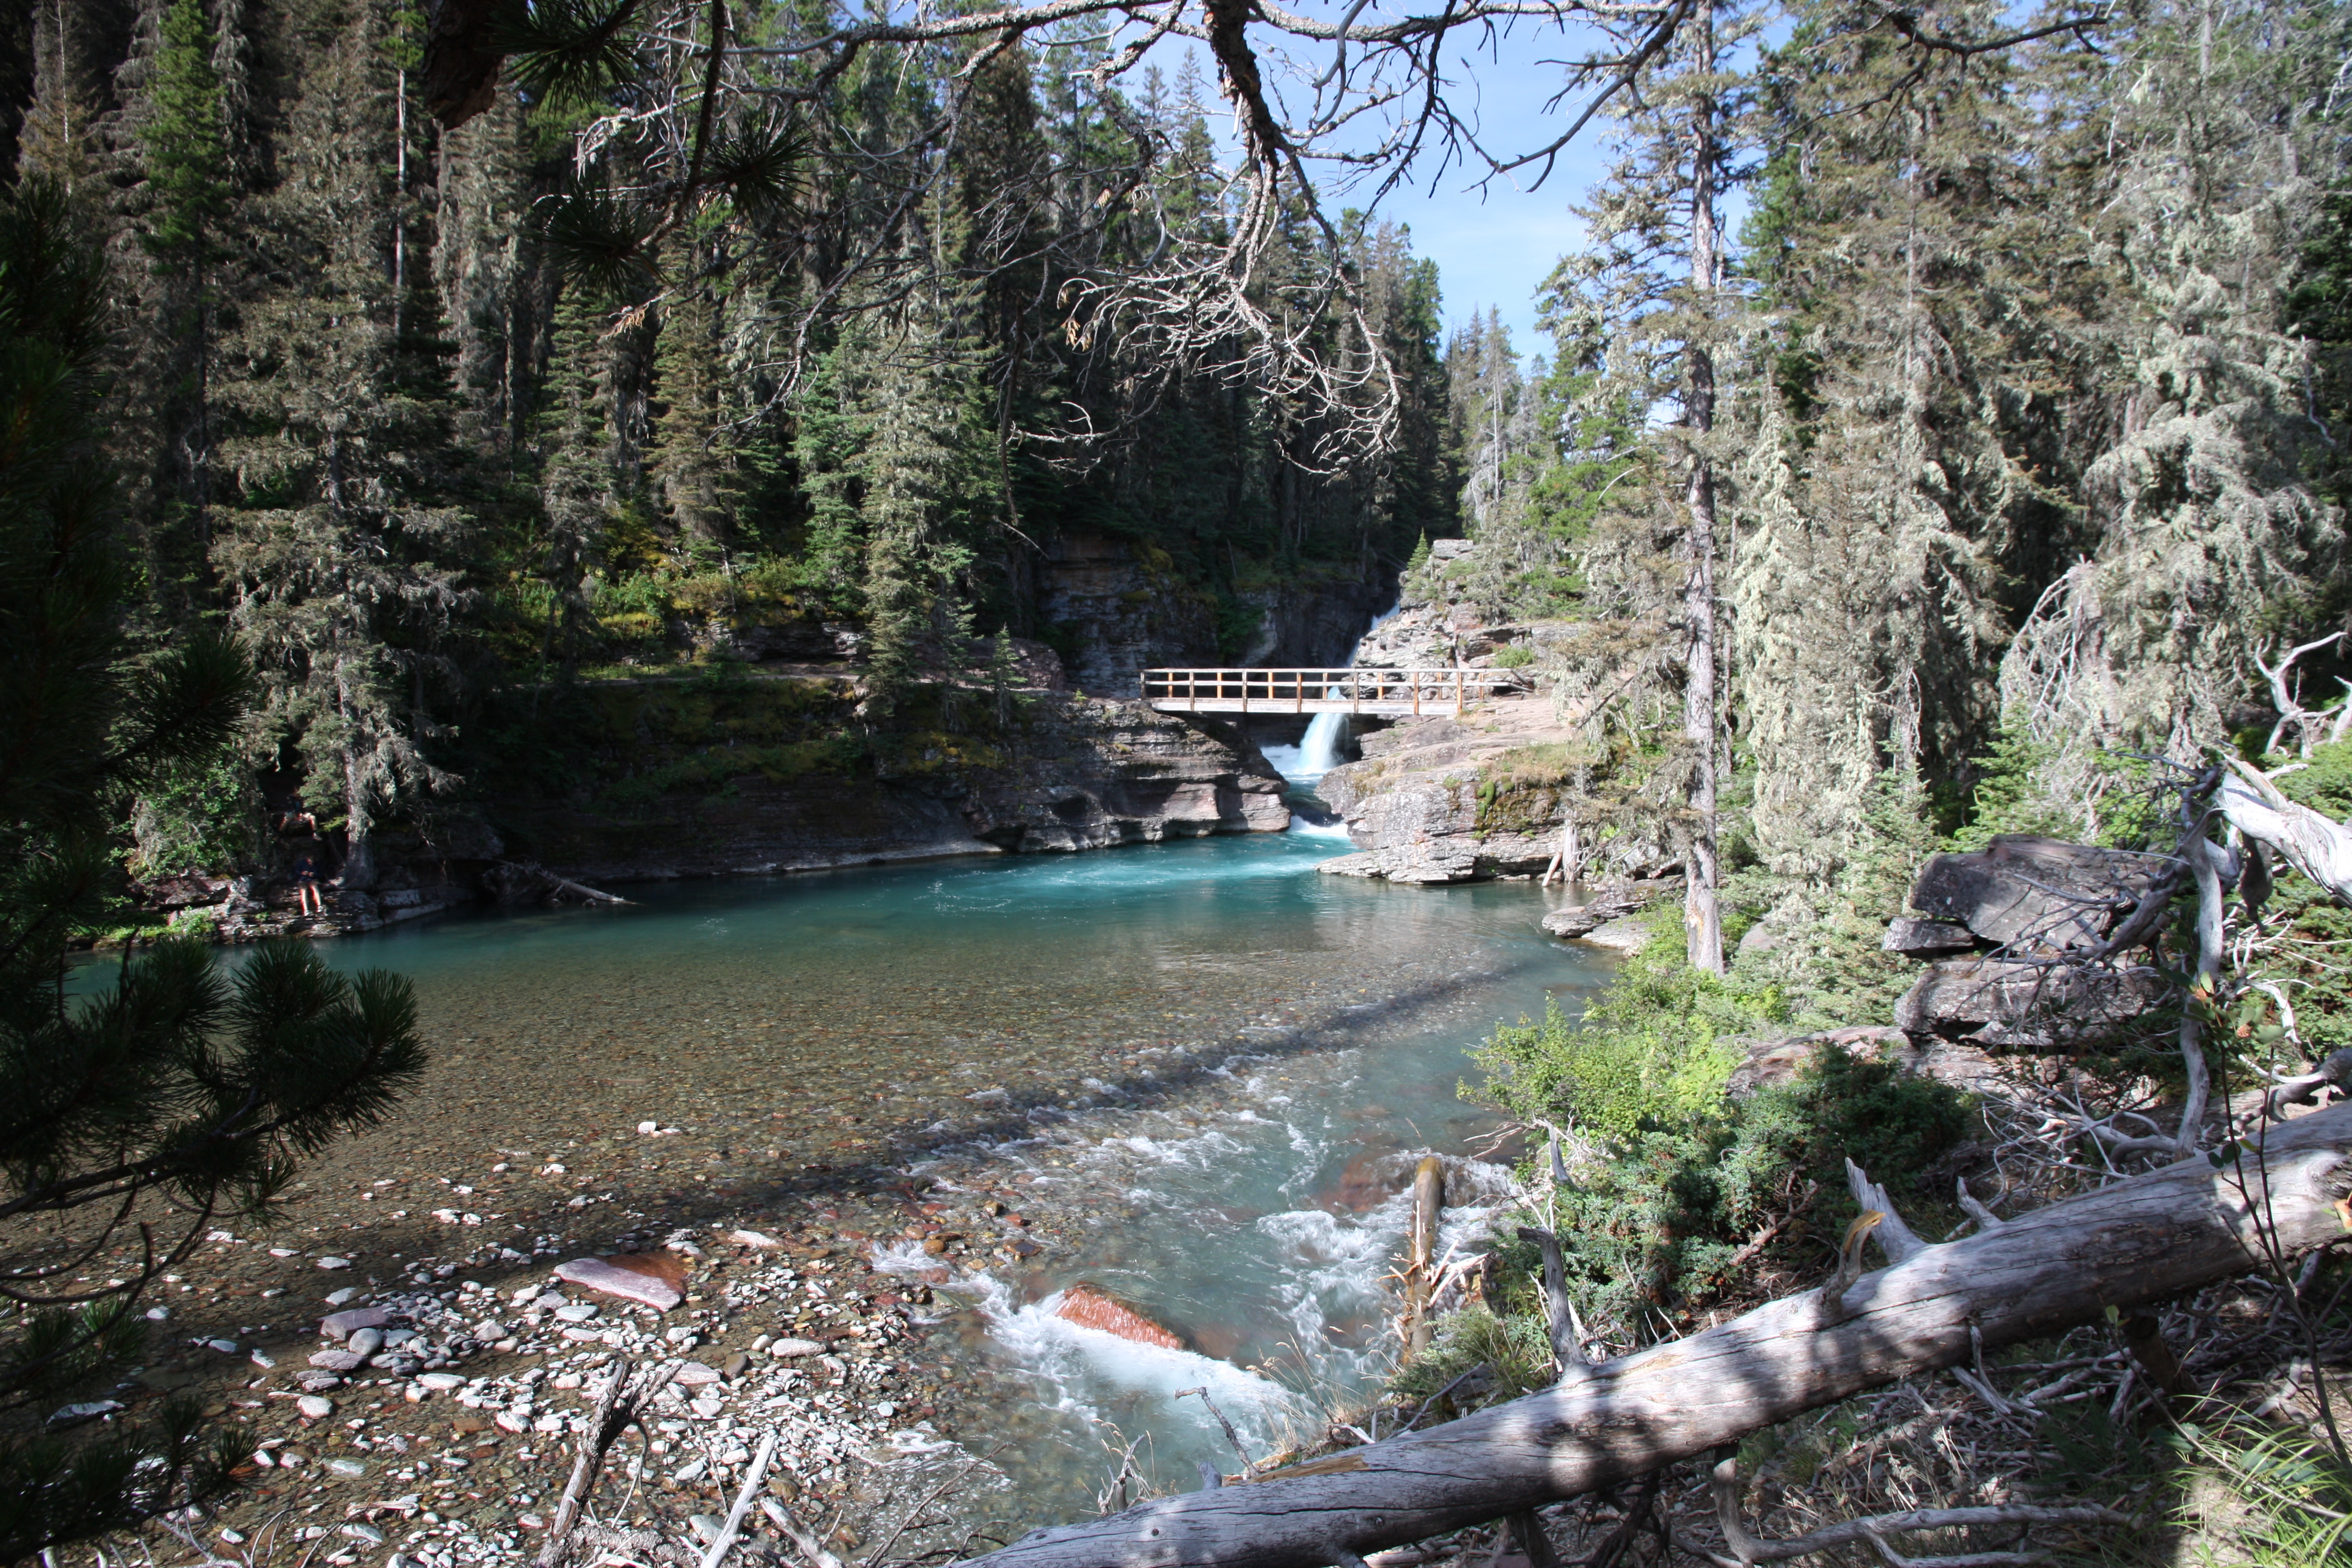
Deadwood Falls on Reynolds Creek in the St. Mary Valley.
Upper Two Medicine Lake from the Boat Landing on the west end of Two Medicine Lake; 4.6 miles out-and-back; this is a moderate uphill hike on the way to Upper Two Medicine Lake and downhill on the return. We chose to ride the boat out to the trailhead (for a fee); this is not required, though it is almost triple the distance if you choose to hike the whole route starting near the Two Medicine Visitor Center.
The windblown waters of Upper Two Medicine Lake.

I recommend a stop to see Running Eagle Falls on the way up to Two Medicine.
Iceberg Lake from the Many Glacier Visitor Center; 10 miles out-and-back; there is about a two thousand foot elevation gain on this hike, all uphill on the way out and all downhill on the way back. This is a tough hike so give yourself plenty of time, with margin built in to rest and take in the scenery at the top.

Beargrass and the incredible mountain views along the Iceberg Lake Trail.

Mountain meadow wildflowers with Iceberg Lake in the distance.
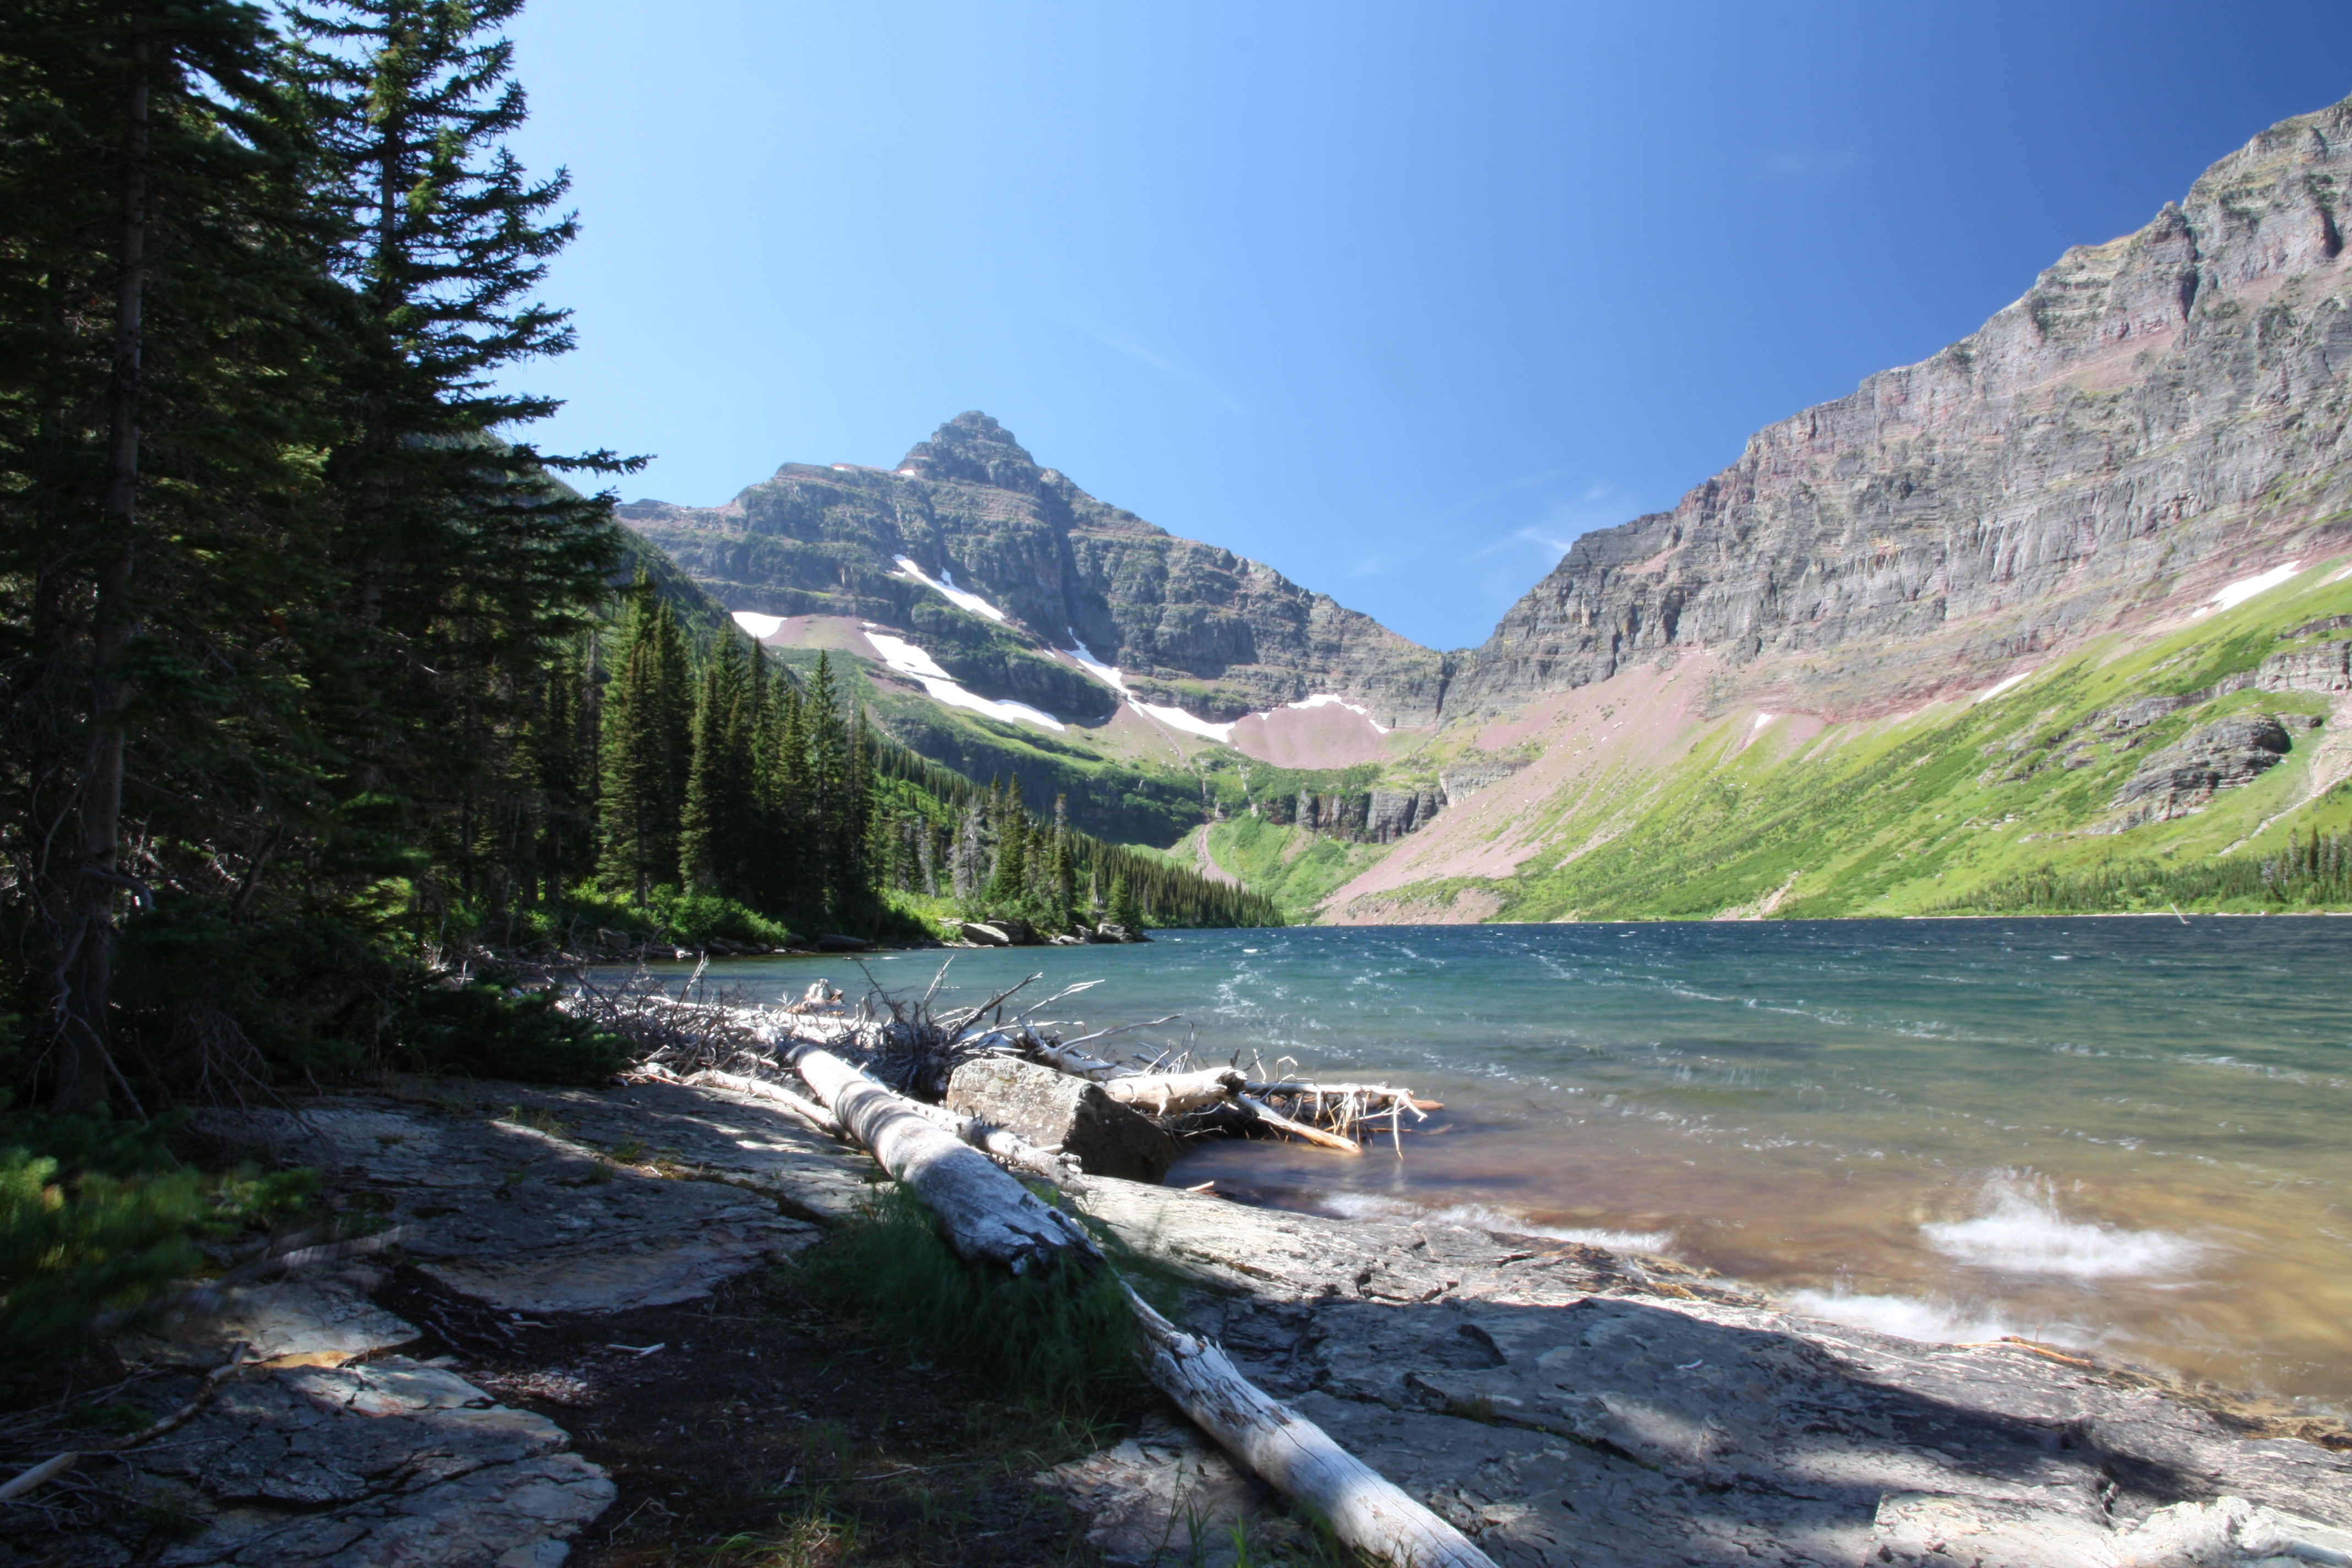
Grinnell Glacier from the Swiftcurrent trailhead (Many Glacier); 9.6 miles out-and-back; this is pretty much the same configuration as the Iceberg Lake hike, with about a two thousand foot elevation gain, all uphill on the way out and all downhill on the way back. This is another tough hike so, again, give yourself plenty of time to rest and take in the scenery at the top.
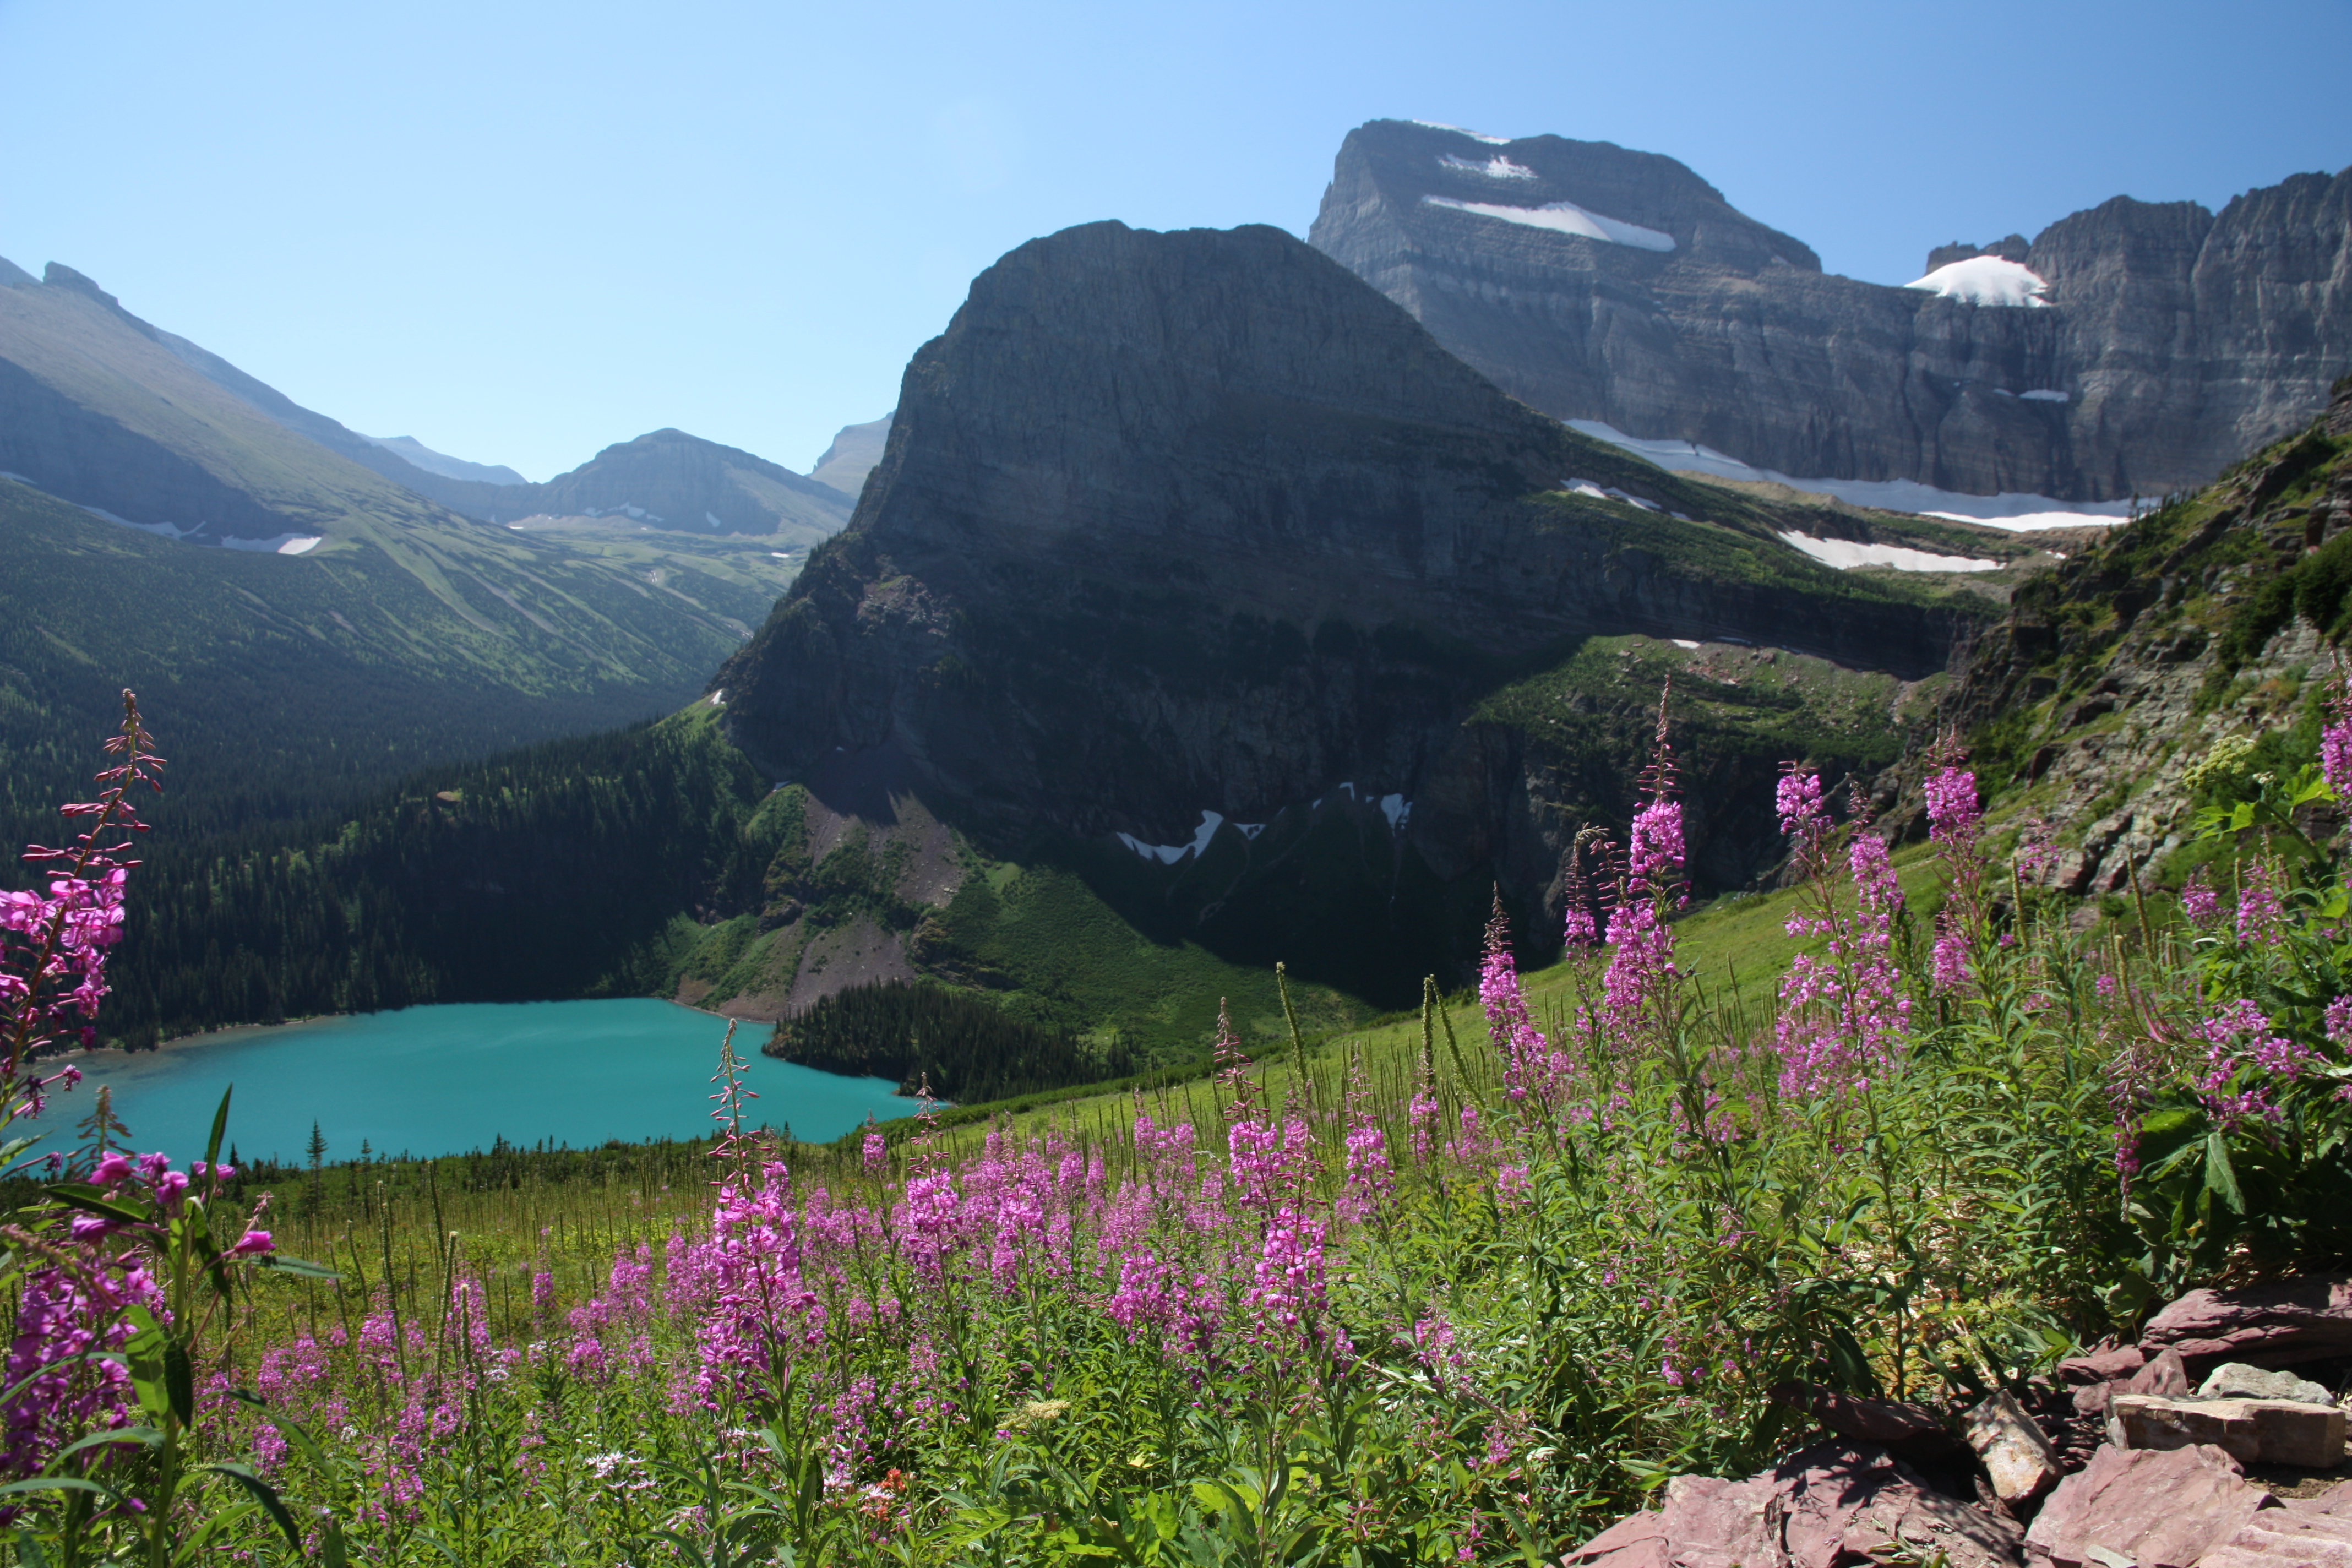
Fireweed accents the view overlooking the sparkling blue waters of Grinnell Lake.

Spectacular view from above Grinnell Glacier.
Hidden Lake Overlook from the Logan Pass Visitor Center; 2.6 miles out-and-back; this is a short and fairly easy hike, though it is all uphill on the way out and downhill on the way back.
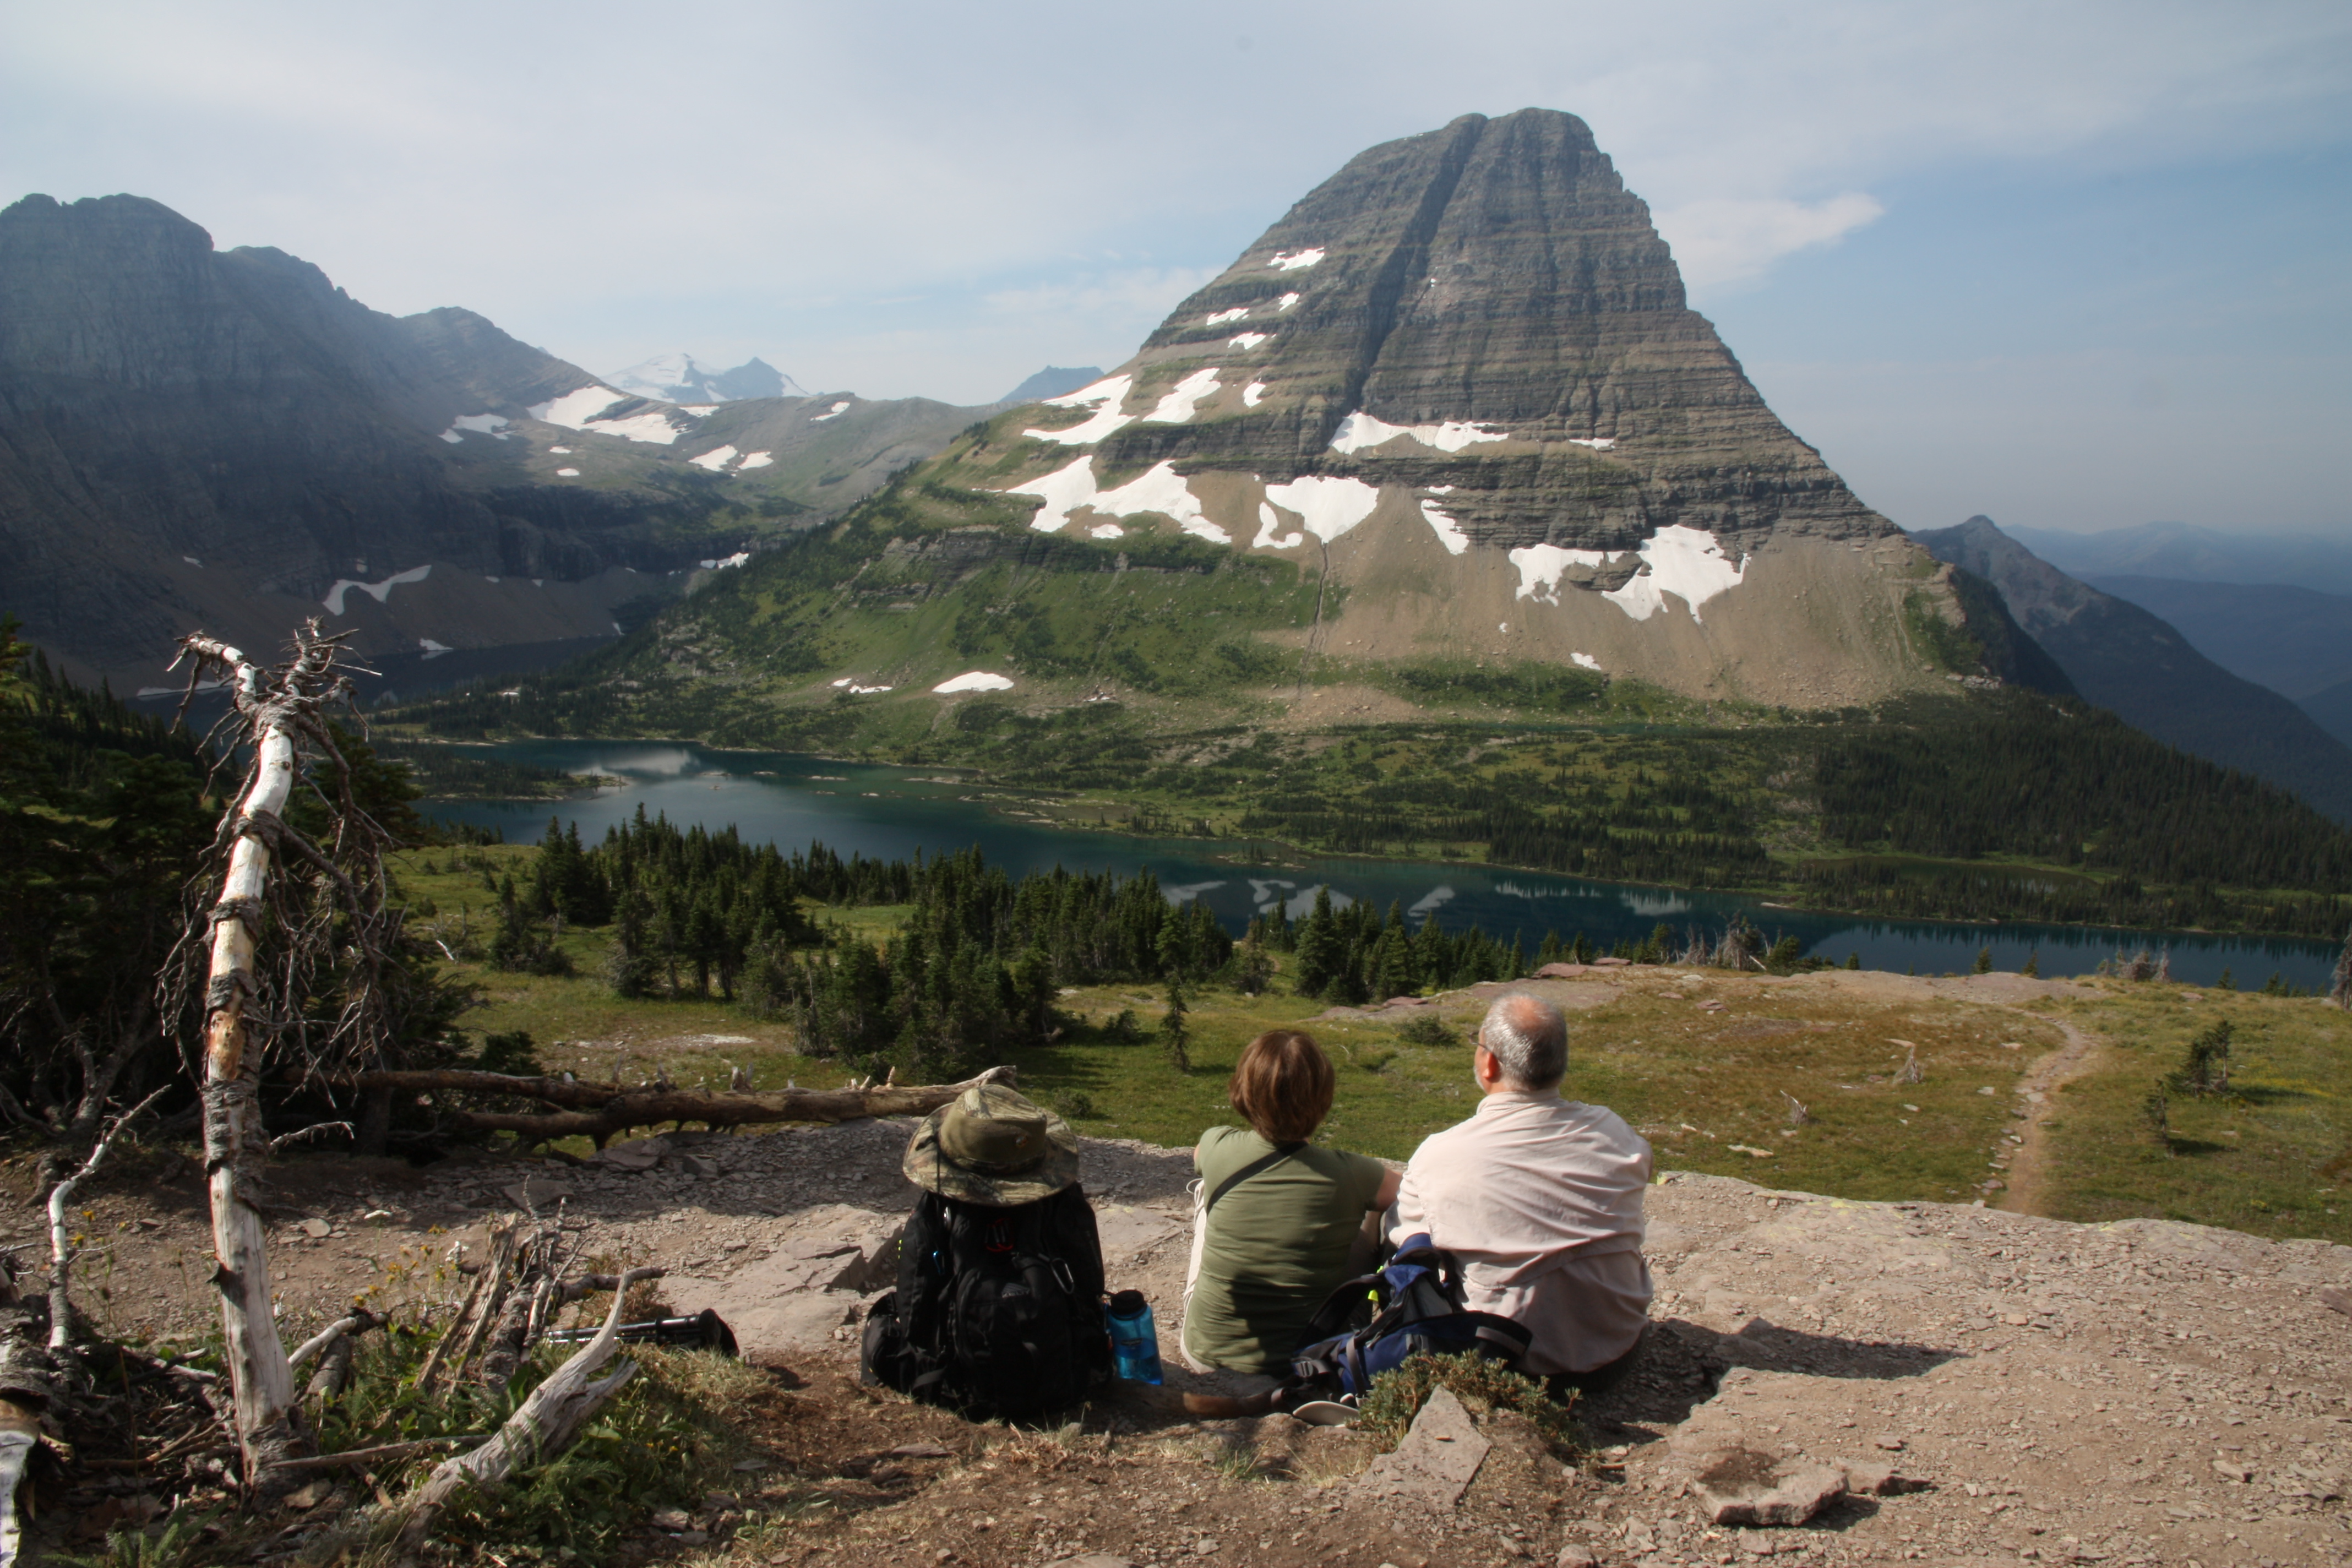
Enjoying the view from the Hidden Lake Overlook.
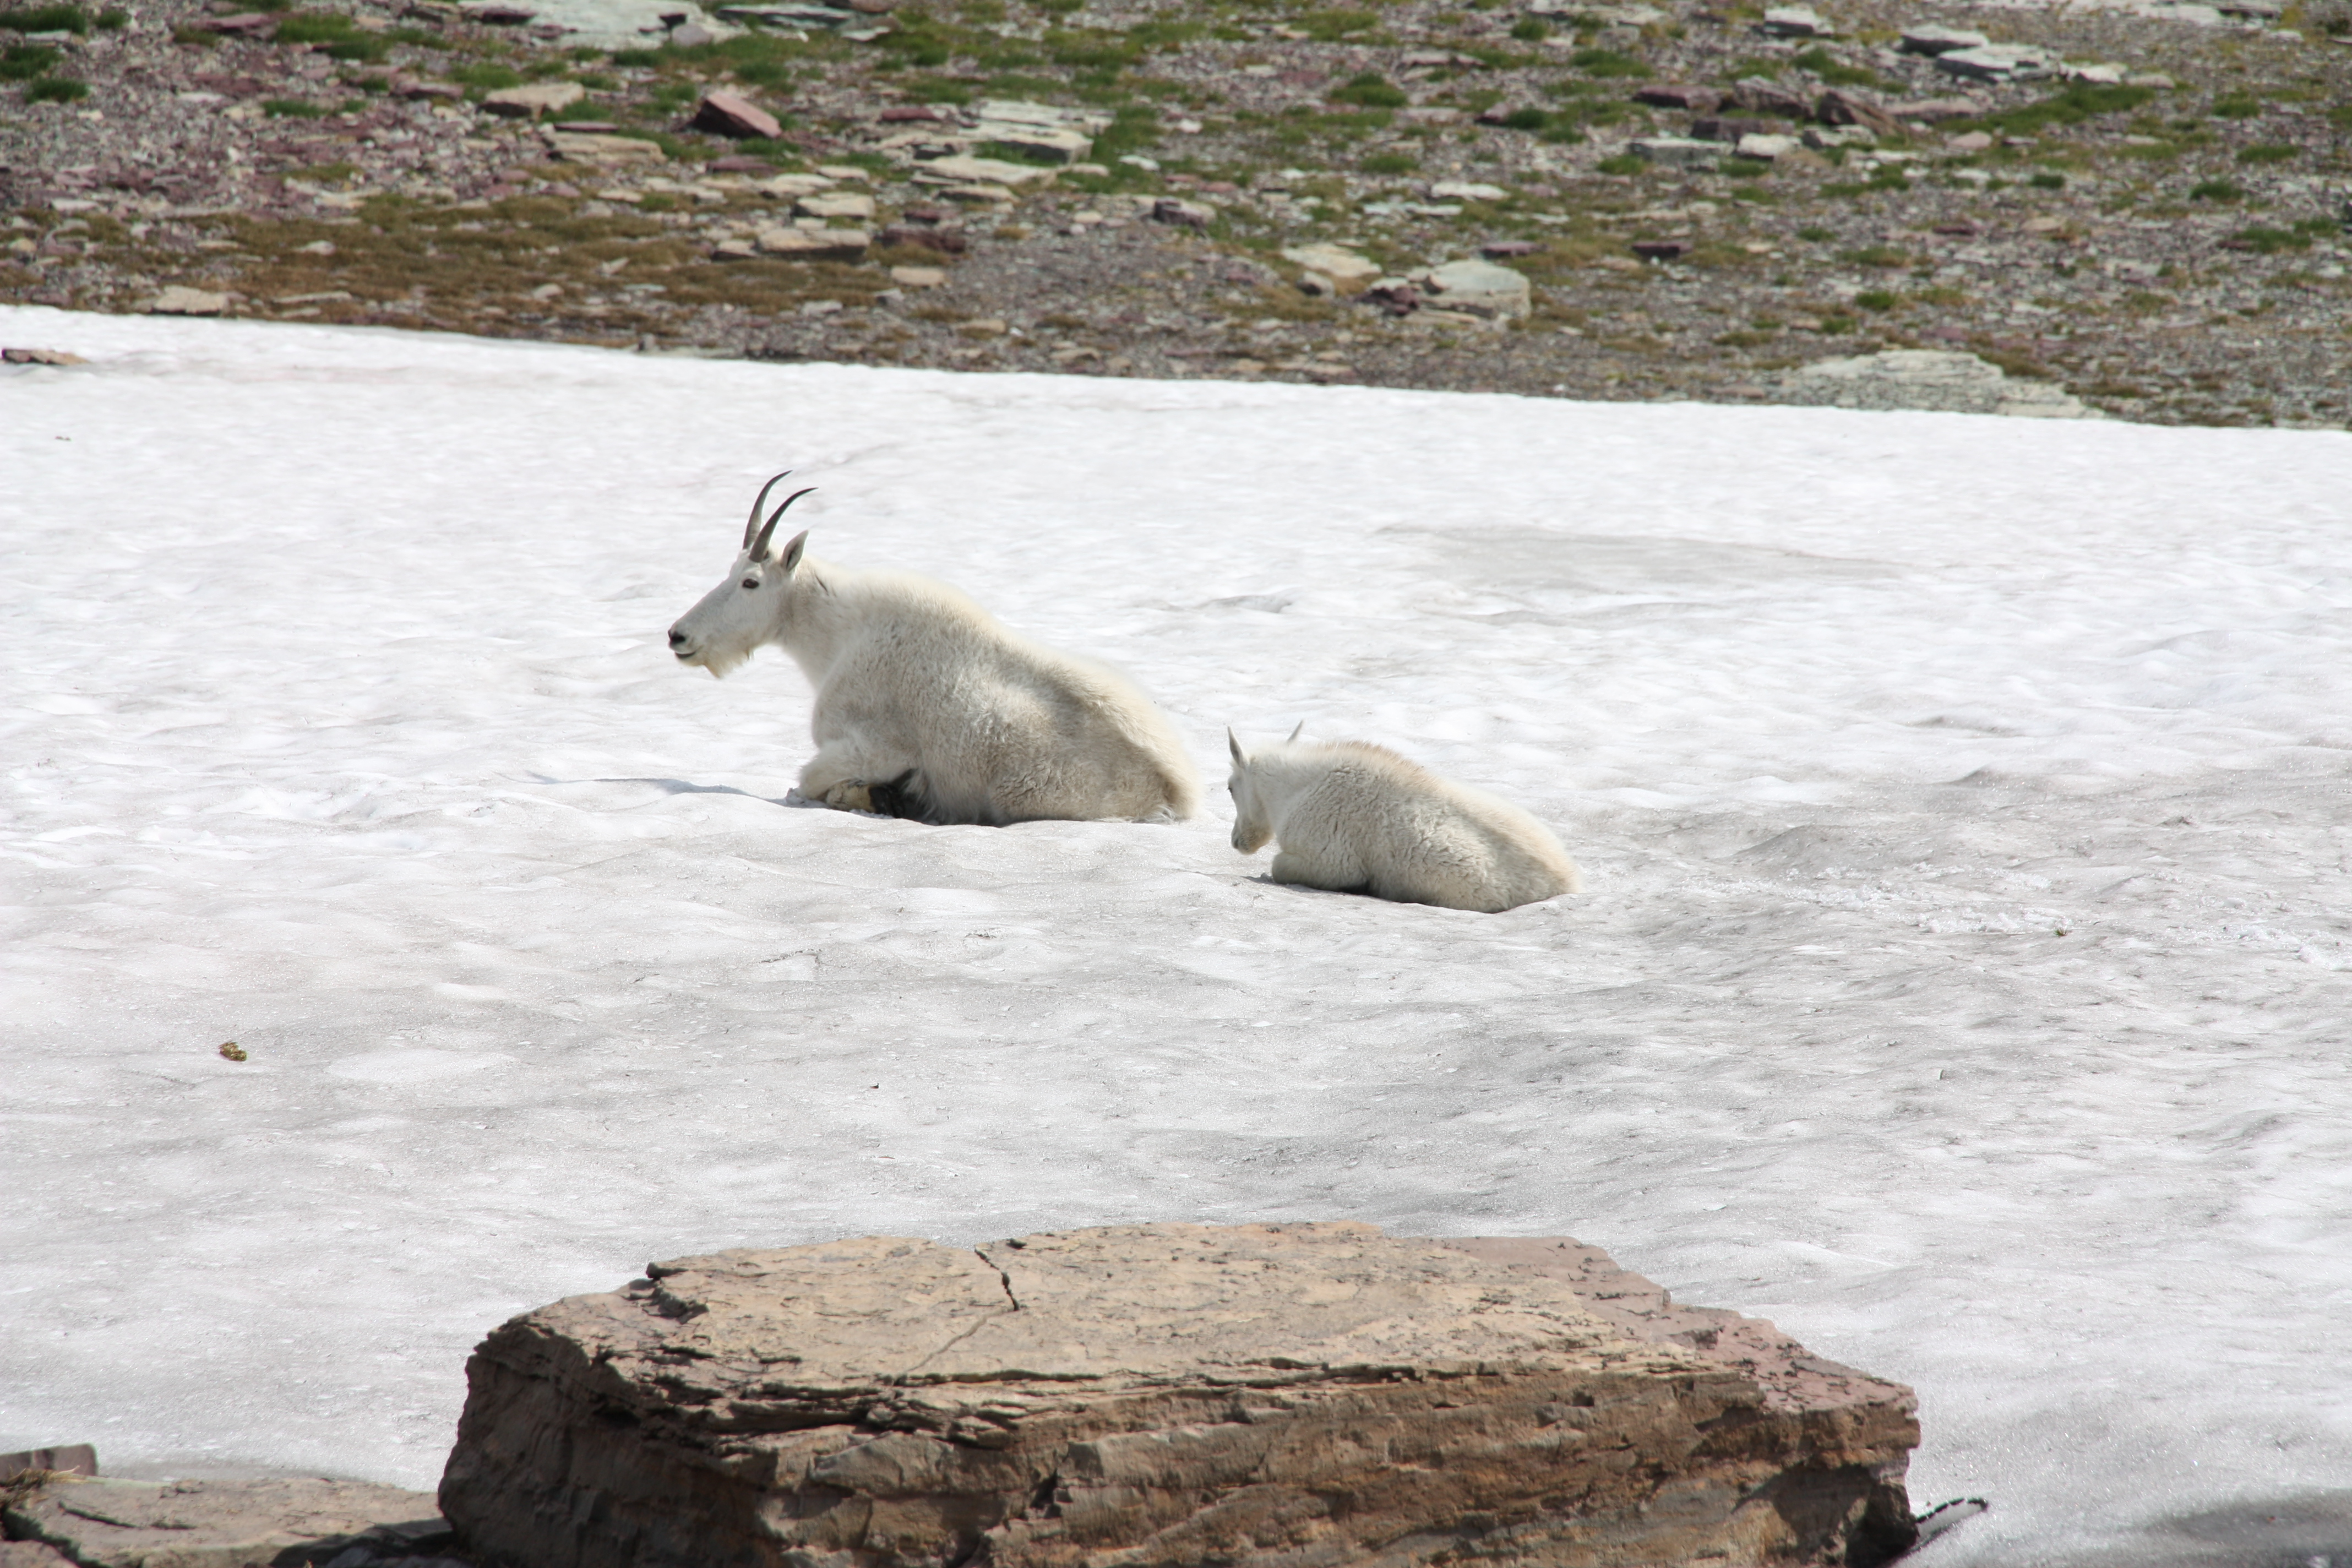
Mountain goats in the snow above the Logan Pass Visitor Center.
Our time in Glacier National Park was an amazing experience! The most difficult task I faced in writing this post was deciding which of the over 1000 photographs to include. I hope the ones I chose provide you with the inspiration to take a trip there yourself, you won’t regret it!
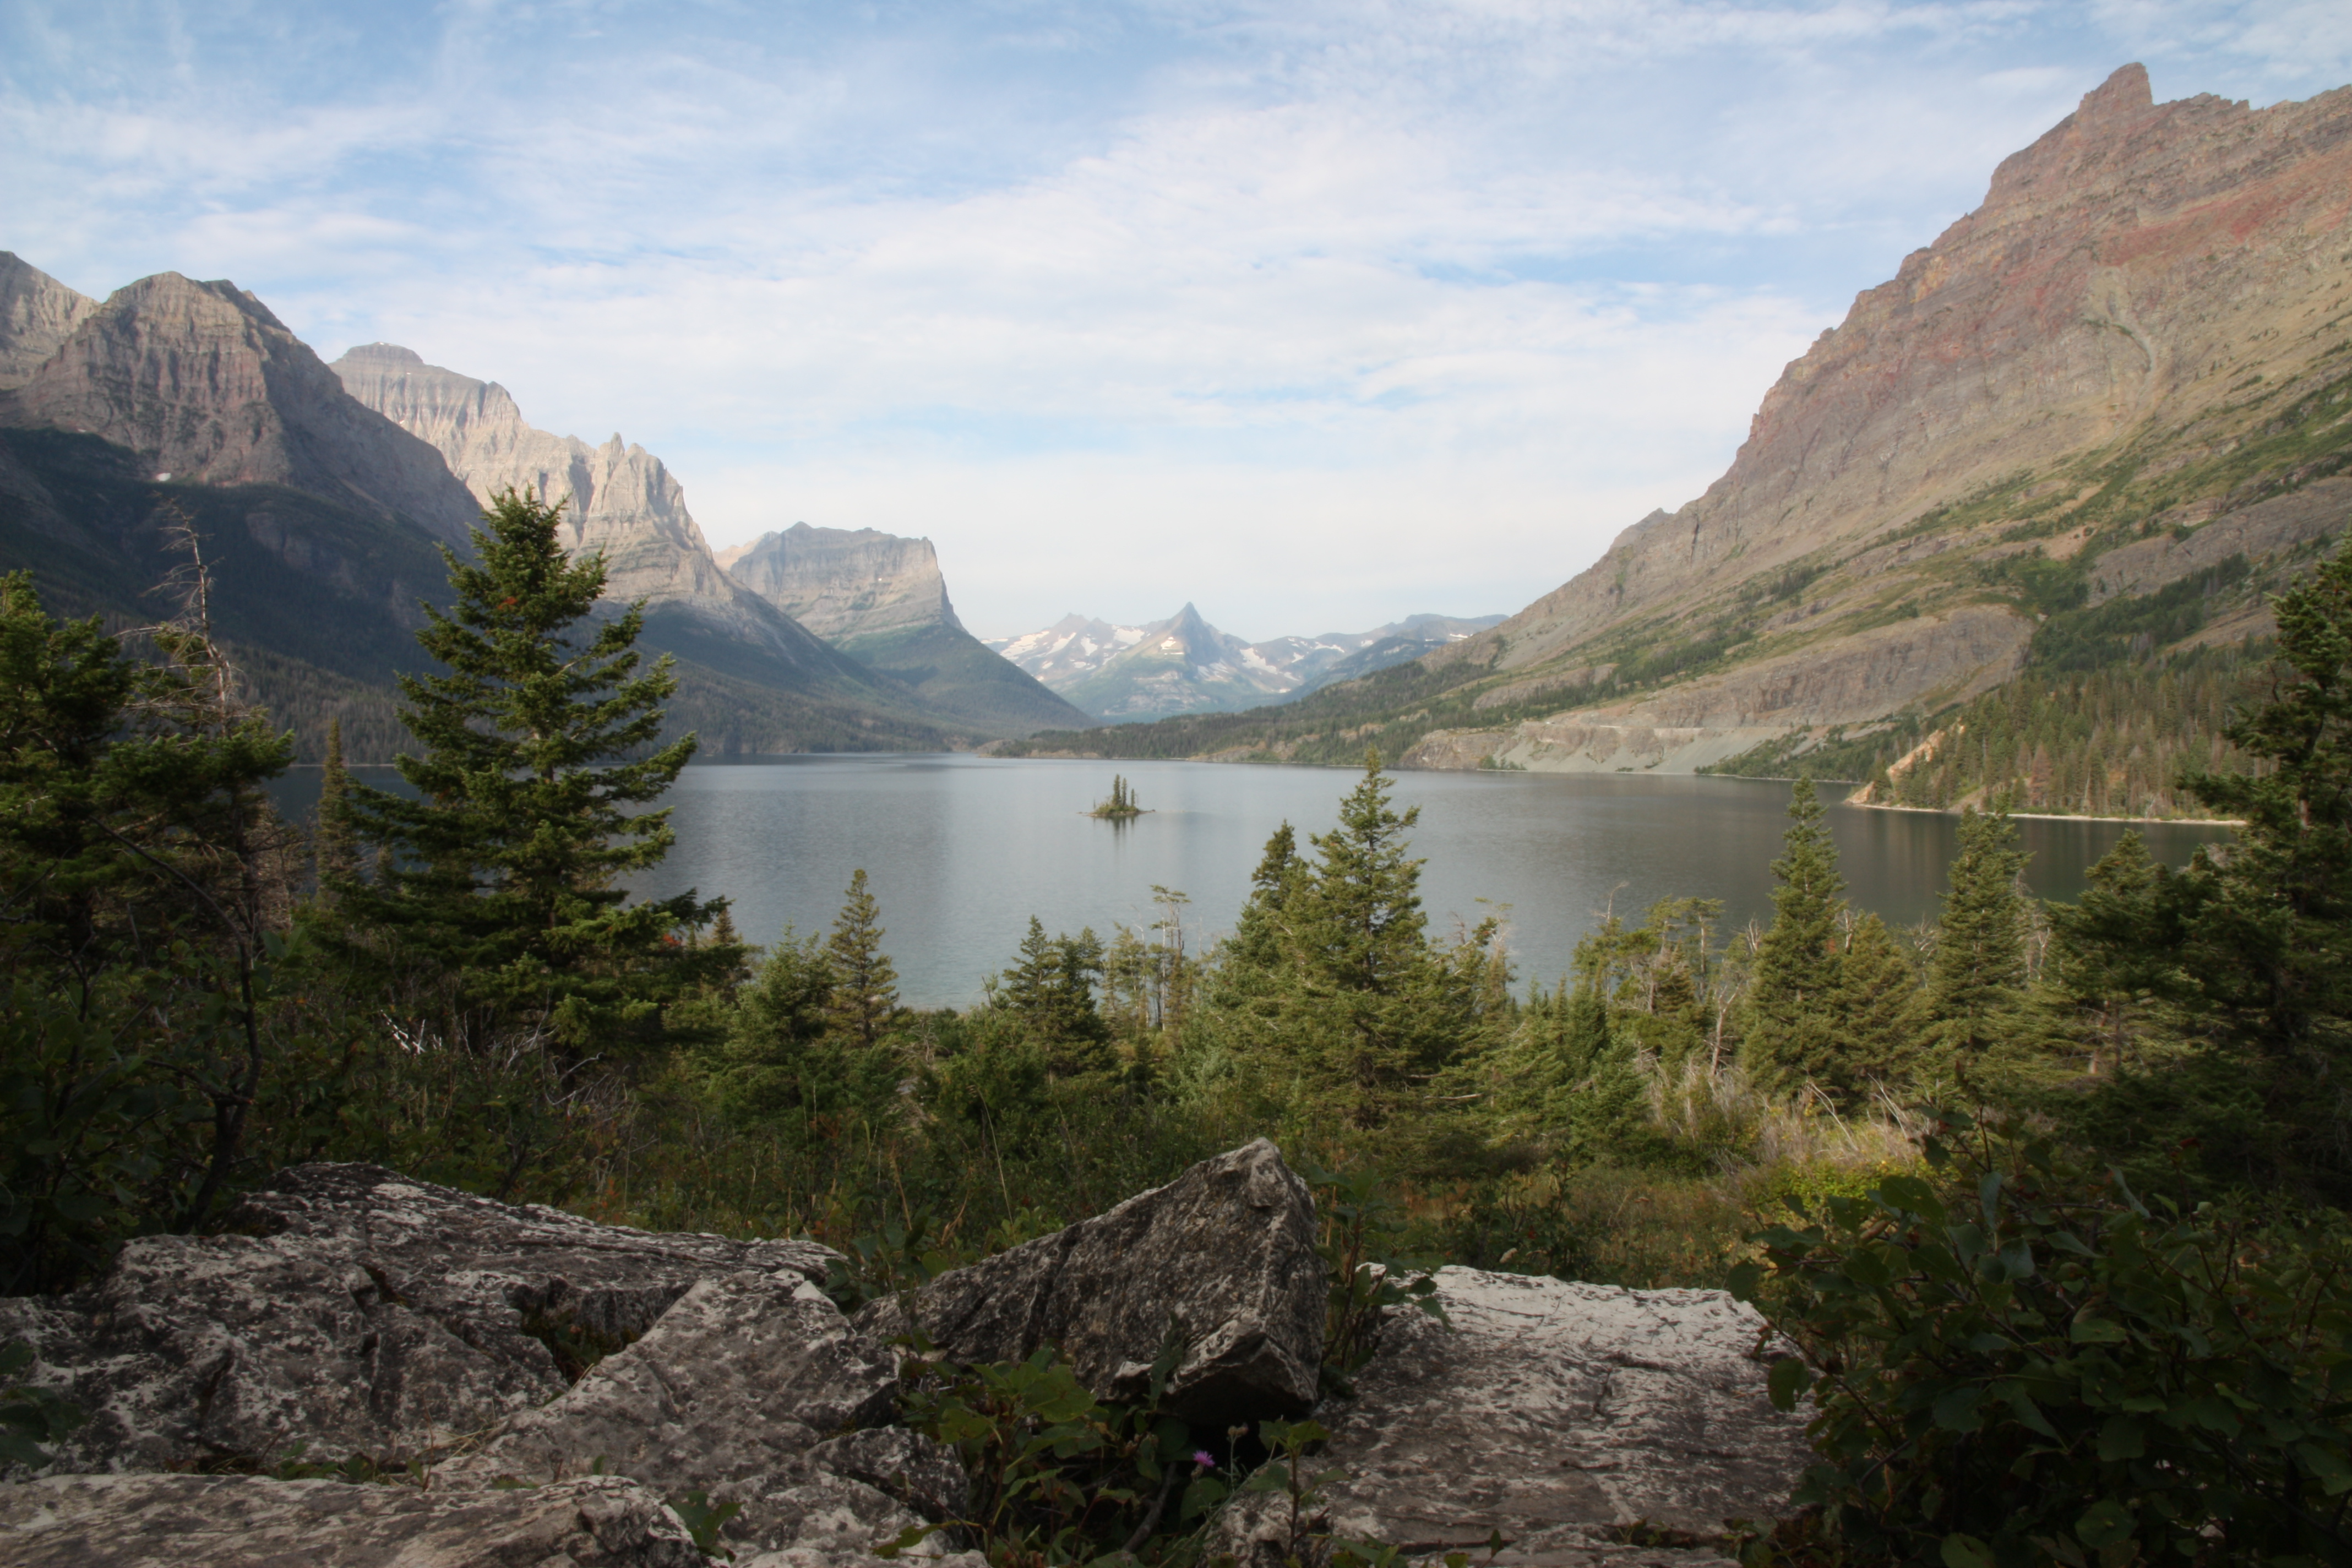
No visit to Glacier National Park would be complete without a stop to snap a shot of the iconic St. Mary Lake and Wild Goose Island from the scenic overlook along Going-to-the-Sun Road.
© Todd D. Nystrom and Todd the Hiker, 2015-2020.
Philippians 3:7-14 (ESV) – But whatever gain I had, I counted as loss for the sake of Christ. Indeed, I count everything as loss because of the surpassing worth of knowing Christ Jesus my Lord. For his sake I have suffered the loss of all things and count them as rubbish, in order that I may gain Christ and be found in him, not having a righteousness of my own that comes from the law, but that which comes through faith in Christ, the righteousness from God that depends on faith–that I may know him and the power of his resurrection, and may share his sufferings, becoming like him in his death, that by any means possible I may attain the resurrection from the dead. Not that I have already obtained this or am already perfect, but I press on to make it my own, because Christ Jesus has made me his own. Brothers, I do not consider that I have made it my own. But one thing I do: forgetting what lies behind and straining forward to what lies ahead, I press on toward the goal for the prize of the upward call of God in Christ Jesus.
 A view looking west from one of the side trails along the unofficial Star Gap Arch trail. The furthest ridge in the center of the photo is our goal on this hike.
On a backpacking trip to Kentucky’s Red River Gorge early this fall, we decided to explore a trail that was new to us, the unofficial Star Gap Arch trail. Though I knew from our outrageGIS map and the description in Jerrell Goodpaster’s book, “Hinterlands,” that there were many spectacular views along the way, and at the end of the hike, there were still a few times we considered turning back. The hike was difficult at times, involving rock scrambles and thick brush; but, having a goal in mind and some idea of what lie ahead, were key to our perseverance.
 A closer view of the end point on the Star Gap Arch trail.
Even though you may not get a complete picture of what to expect when hiking in a new place, or even on a new trail in a familiar place, it is worth taking time to do some research. Studying topographic maps, reading a guide book, or finding online reviews from other hikers, can give you motivation to both start and complete a new adventure.
 The final climb up the ridge at the end of the Star Gap Arch trail.
In many ways our Christian walk is like a hike in the wilderness. Fortunately, God has given us the ultimate guide book for our journey, the Bible. However, the Bible is far more than just a simple guide book it serves a much greater purpose, pointing us to the ultimate goal, our Lord and Savior, Jesus Christ. Personally knowing the author who actually wrote the guide book is our best assurance of all. We will probably never endure the trials that Paul suffered, but we still need to realize there will be good times and bad, easy days and difficult ones in our lives, but with Christ we can be certain that we will make it to the end.
 One of several spectacular views that awaits you at the end of the Star Gap Arch trail.
There is a price to taking a backpacking trip, we give up modern conveniences, endure difficult terrain, and occasionally suffer cuts and bruises, but getting to experience the beauty of God’s creation along the way and the spectacular views at the end of the trail make it worth the effort. There is also a cost to following Christ, the Bible makes this clear, but how much more incredible will the end of our life’s journey be when we “press on toward the goal for the prize of the upward call of God in Christ Jesus.”
Read more about my “God is Revealed…“ category of posts
© Todd D. Nystrom and Todd the Hiker, 2014.
